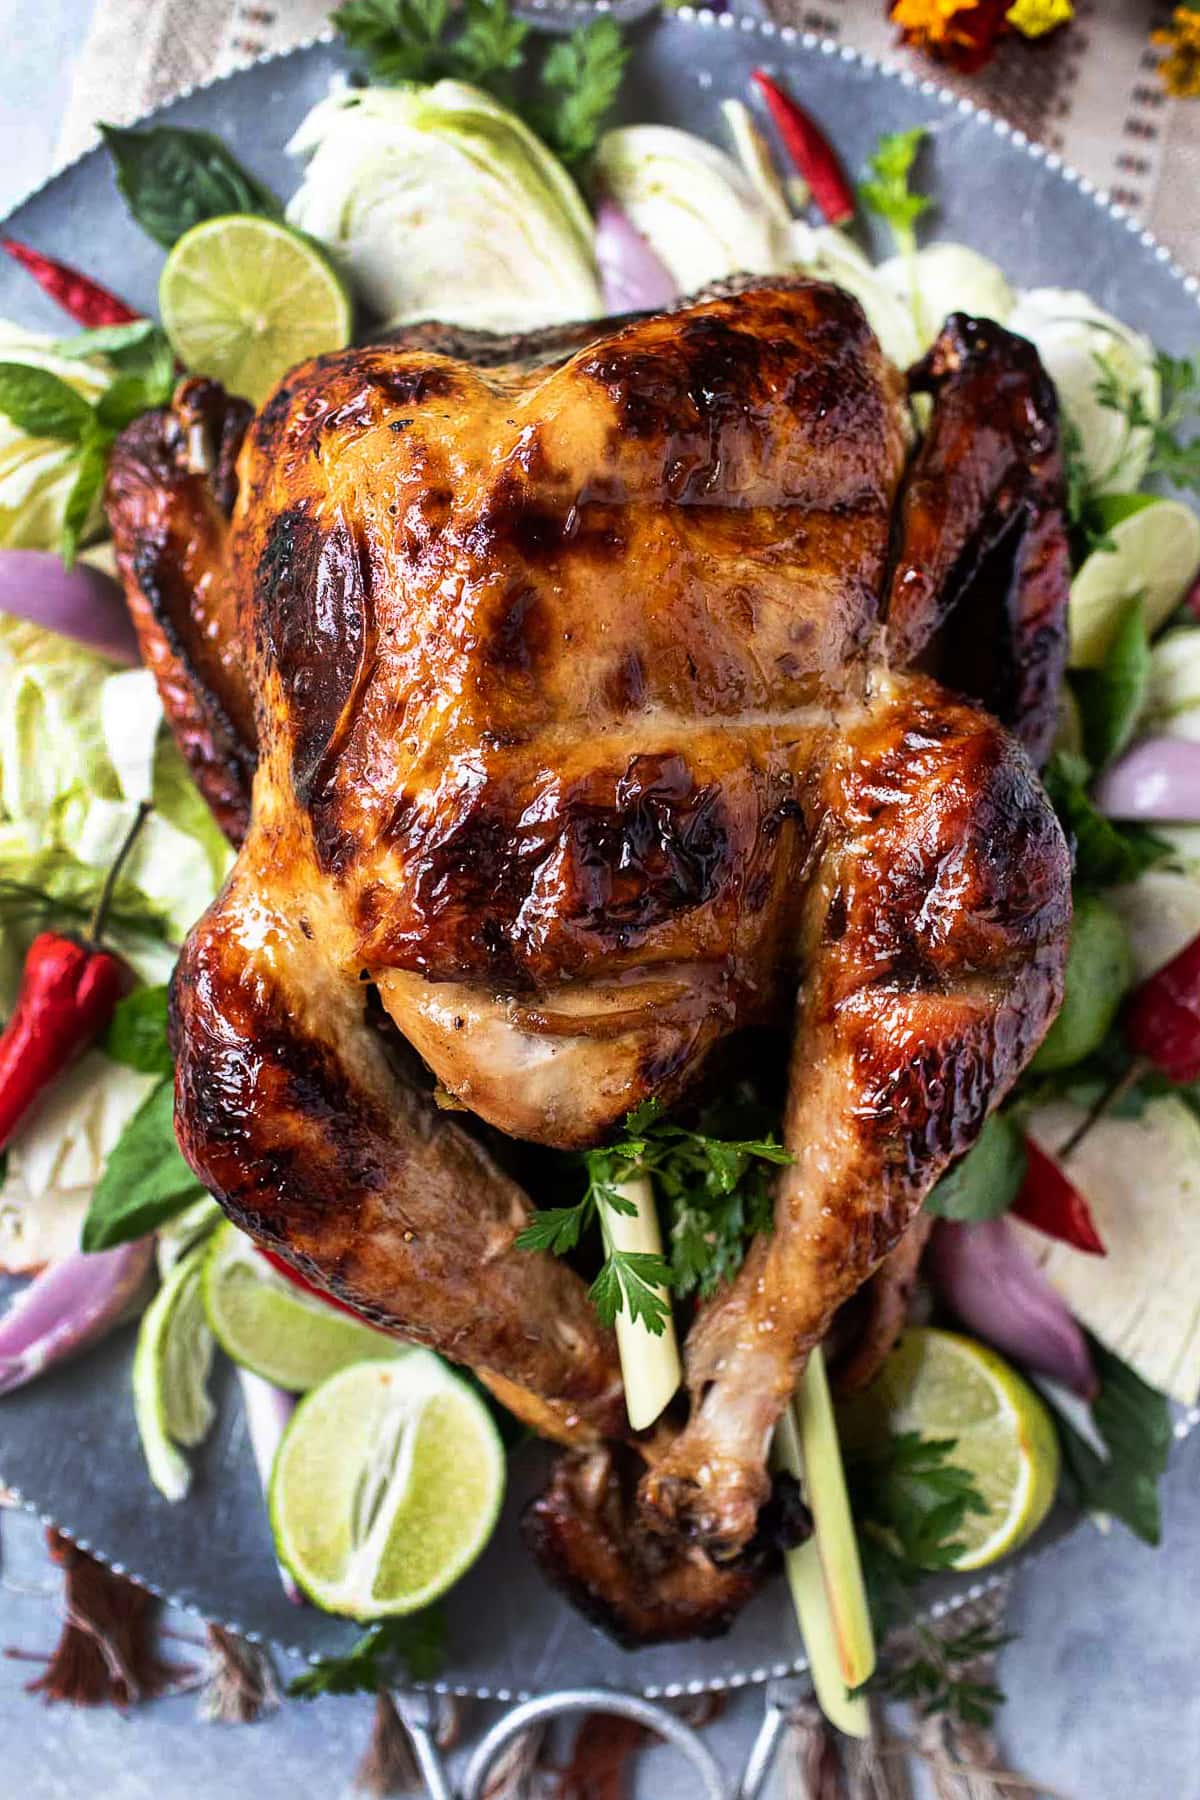
This Thai-style roasted turkey combines the flavors of East and West in one delicious dish! If you love Thai food and want more Thai flavors in your Thanksgiving bird, this turkey recipe is for you!
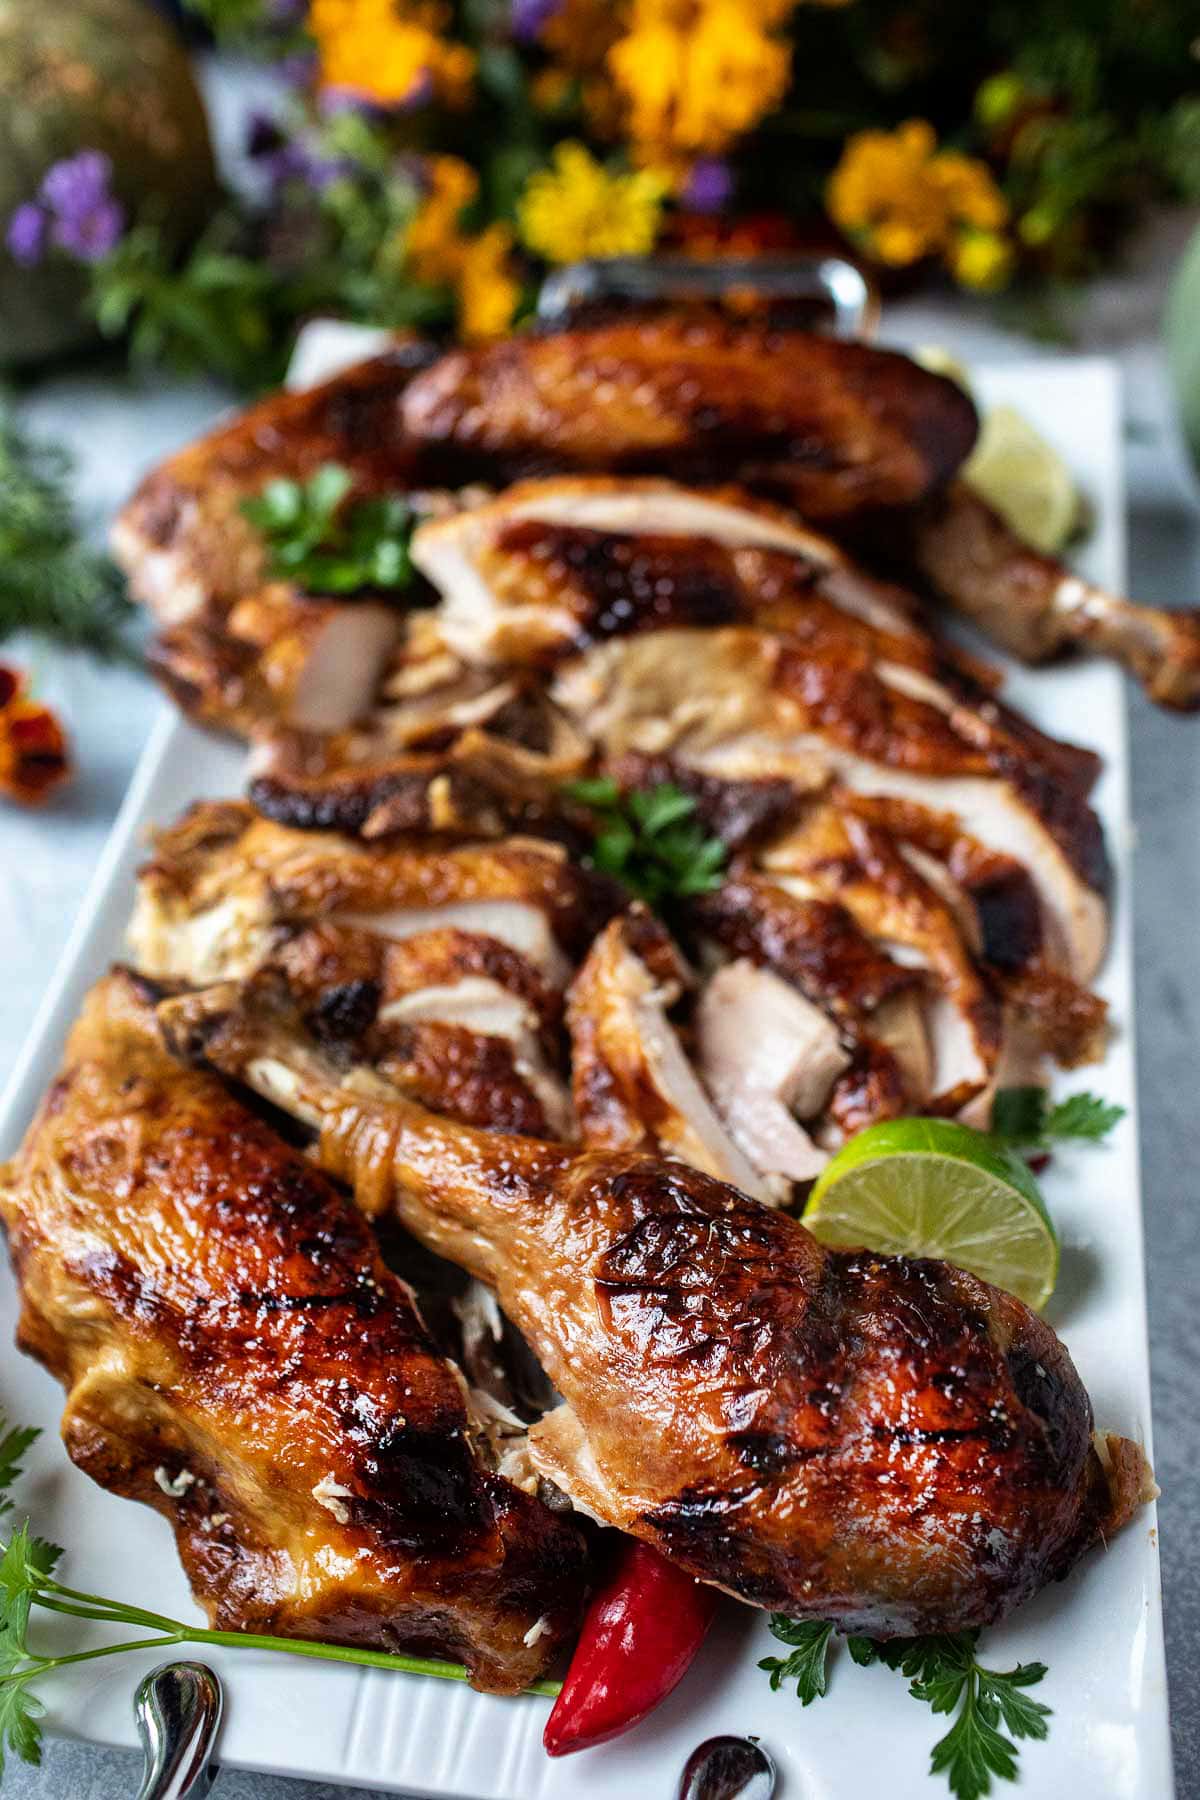
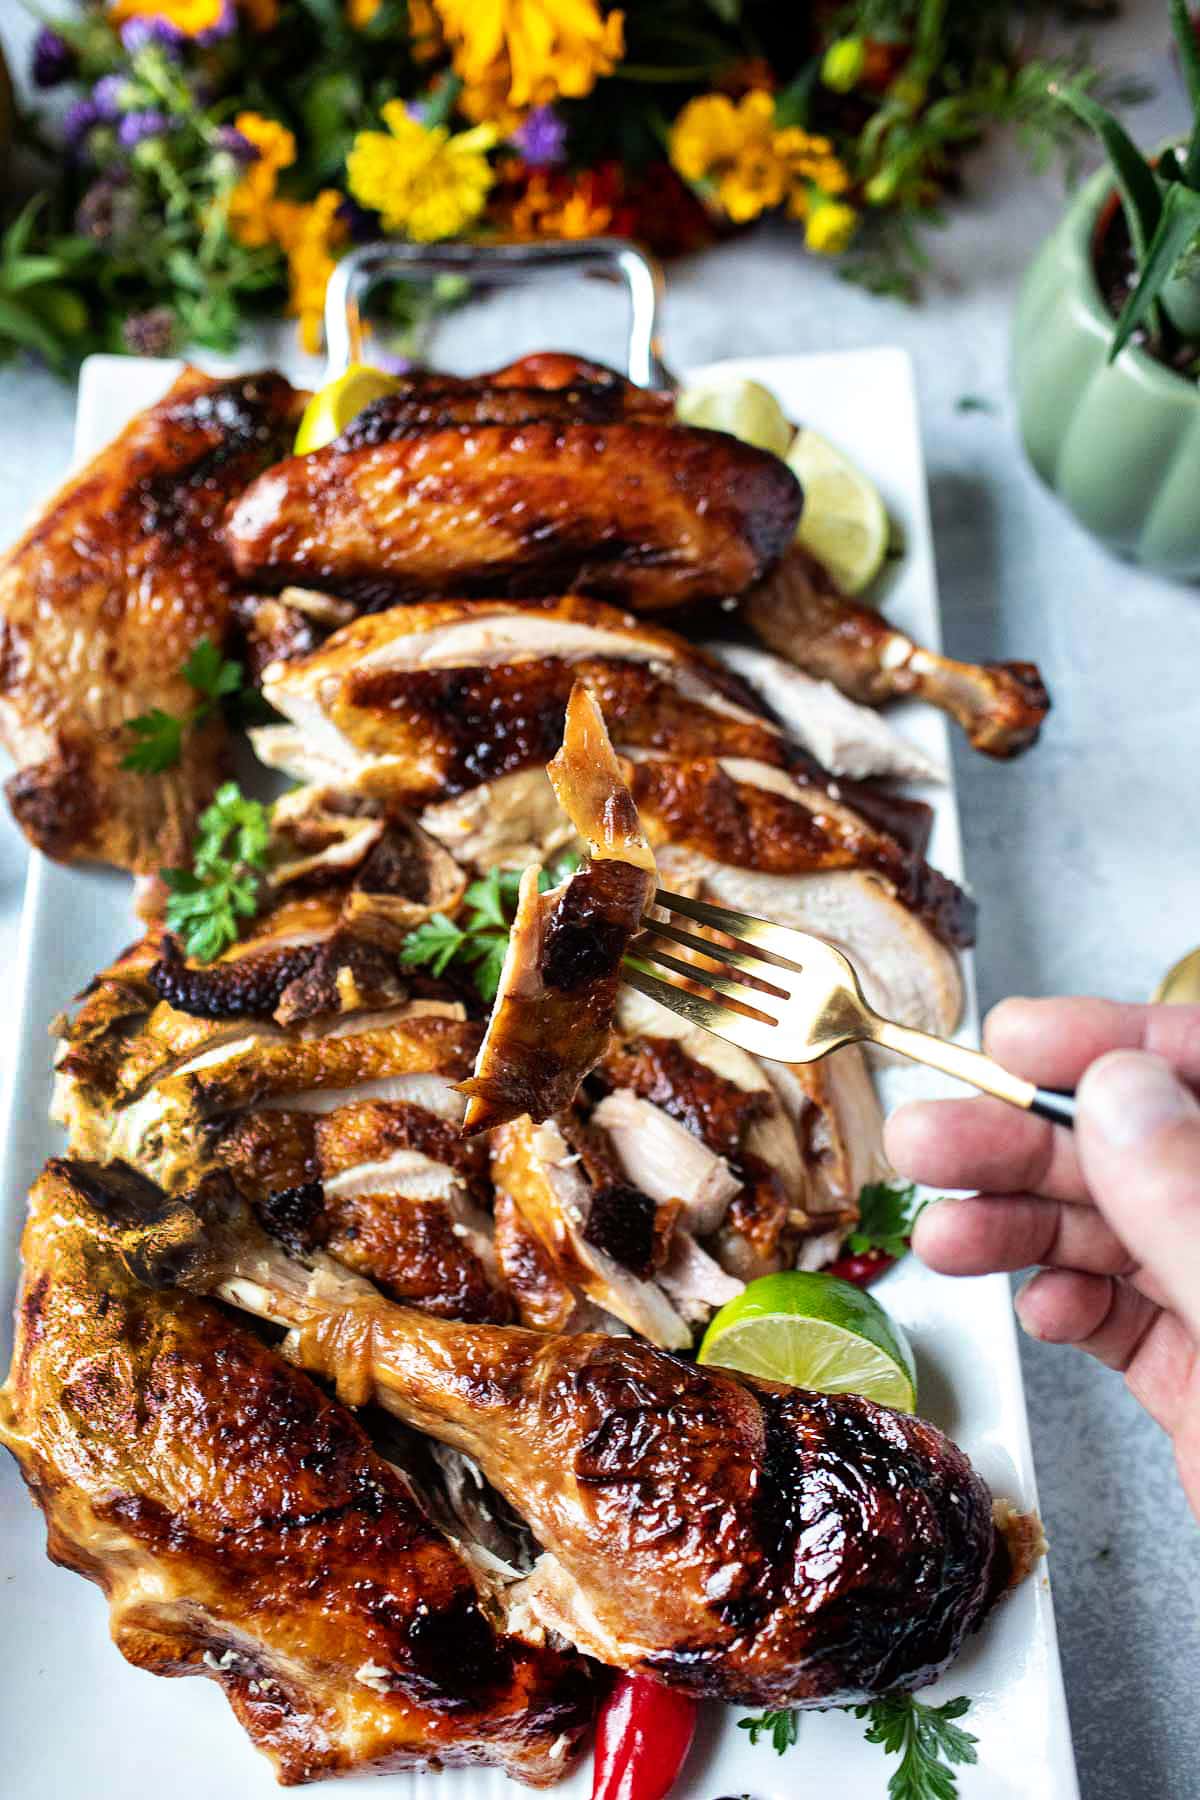
For an amazing turkey meat dipping sauce, I recommend pairing it with these sauces: Thai green sauce, Nam Jim Jeow (with honey), Thai sweet chili sauce, Thai tamarind sauce, easy Pad Thai sauce and Nam Prik Pao. They are perfect for this Thai turkey.
Jump to:
- Why Brining and Marinating
- Why You'll Love This Thai Turkey
- Ingredients for making Thai-style Roasted Turkey
- How To Make Thai Turkey
- Helpful Kitchen Notes and Expert Tips
- Helpful Kitchen Tools for Making Turkey
- More Turkey Recipes You’ll Love!
- Frequently Asked Questions
- Thai Style Roasted Turkey (Brined and Marinated)
Why Brining and Marinating
Thai-style roasted turkey (brined and marinated) doubles in flavors from the brining solution infused with fresh herbs, lemongrass, garlic, and bay leaf. Then, it gets marinated for more flavors with coconut milk, white pepper, and all the delicious Thai sauces.
The brining gives the interior of the turkey meat a juicy and tender taste while the marinating sauce gives the exterior part, especially the skin, the extra crispy taste that you can't stop eating!
I remember having my first turkey after coming to the United States at age 13. I didn't care for it much the first time around. I liked some parts of the turkey, like the dark meat and the cripsy skin, but that's about it. This recipe blog post is inspired by my desire to make turkey as flavorful as possible by infusing it with Thai flavors.
Last year, I made this recipe for my family on Thanksgiving, and it was a hit, even with the kiddos! I have to say. I'm happy with the results! It seems like it's the only way for my family and me to enjoy turkey again after having a few so-so-regular turkeys in the past. (:
For an added international flavor to your Thanksgiving meal, try this Ahi Spicy dipping sauce.
Why You'll Love This Thai Turkey
- The flavors come from your favorite Thai herbs, spices, and sauces, giving the turkey the extra flavors!
- Jazz up your Thanksgiving this year with an Asian flare and flavors with this recipe.
- The turkey is moist from the brine infused with herbs, then marinated for extra Thai flavors!
Ingredients for making Thai-style Roasted Turkey
This recipe has three parts: brining, marinating, and roasting. Don’t worry—it’s easier than it sounds! I’ve included step-by-step photos and detailed instructions to guide you every step of the way. You’ve got this!
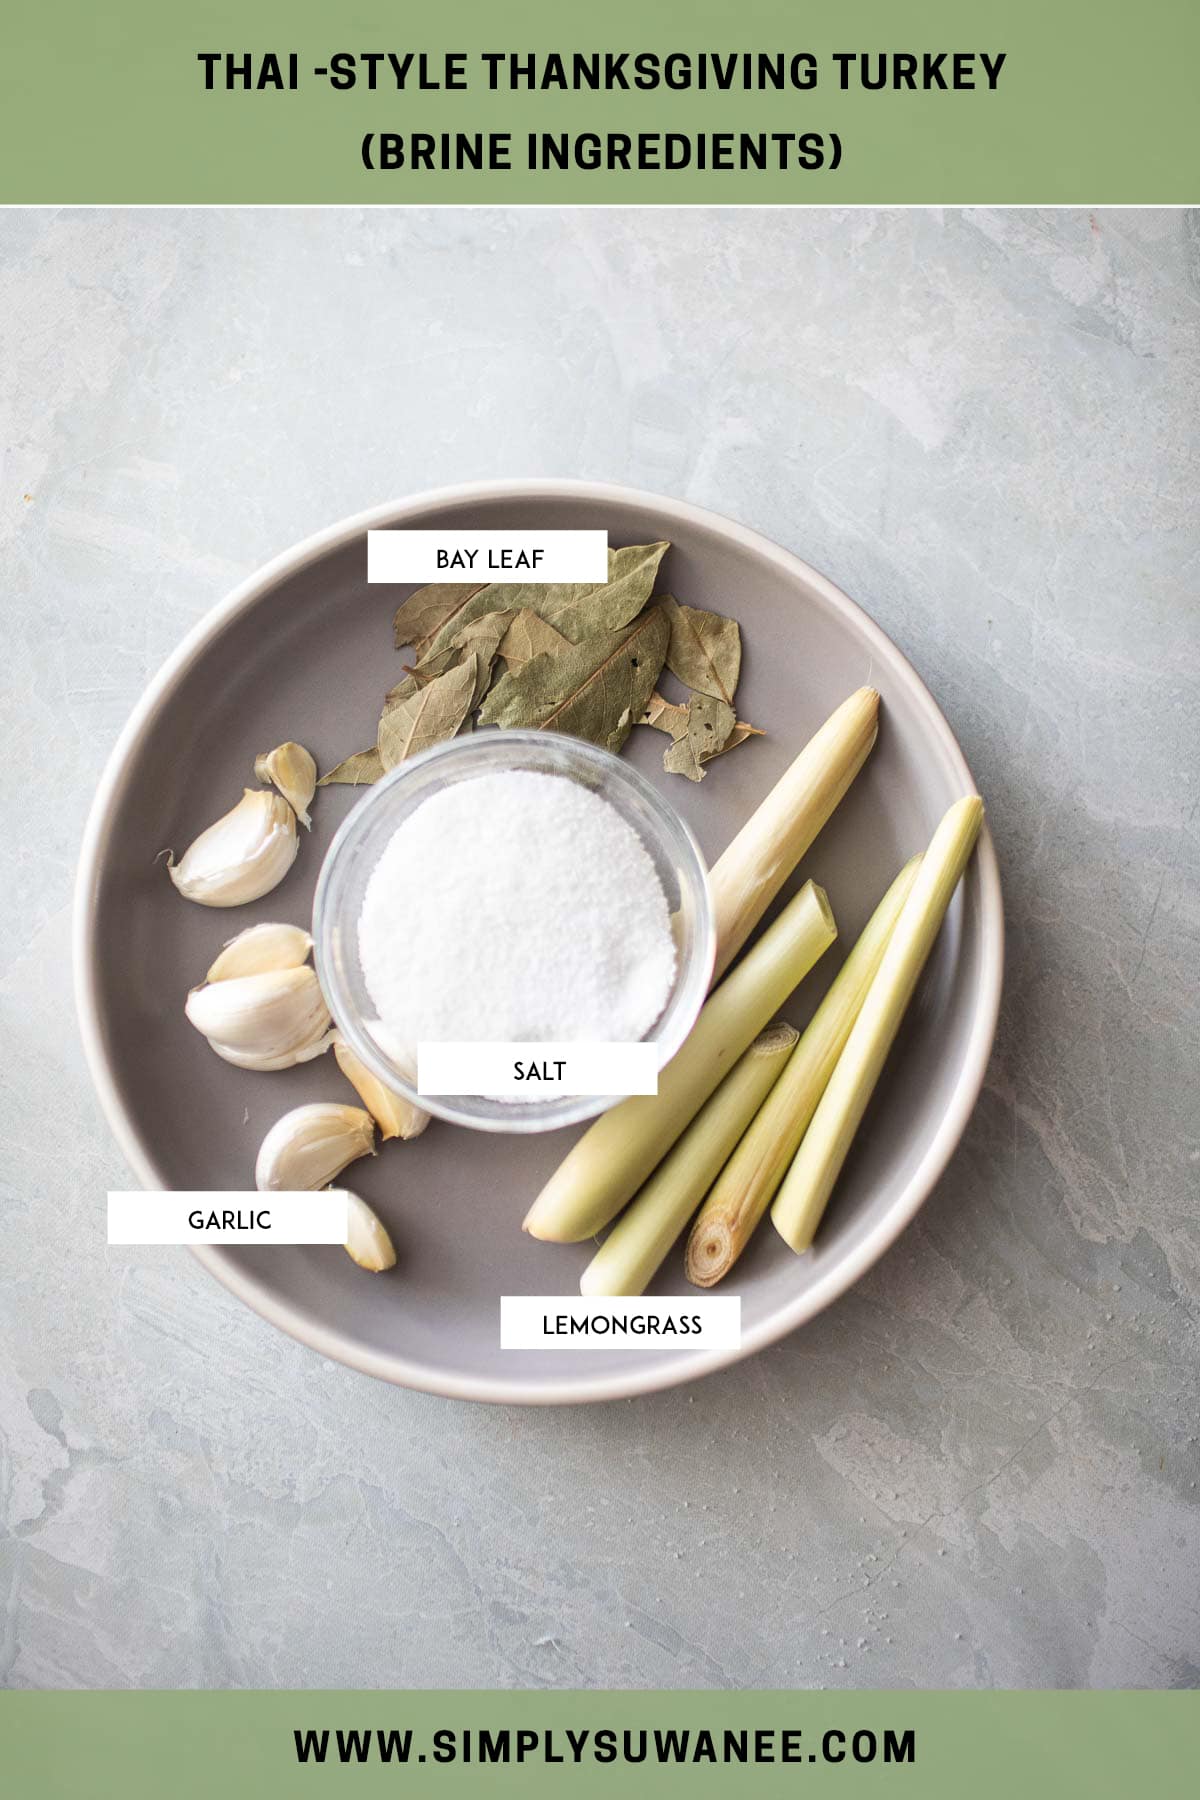
1. Brine Ingredients:
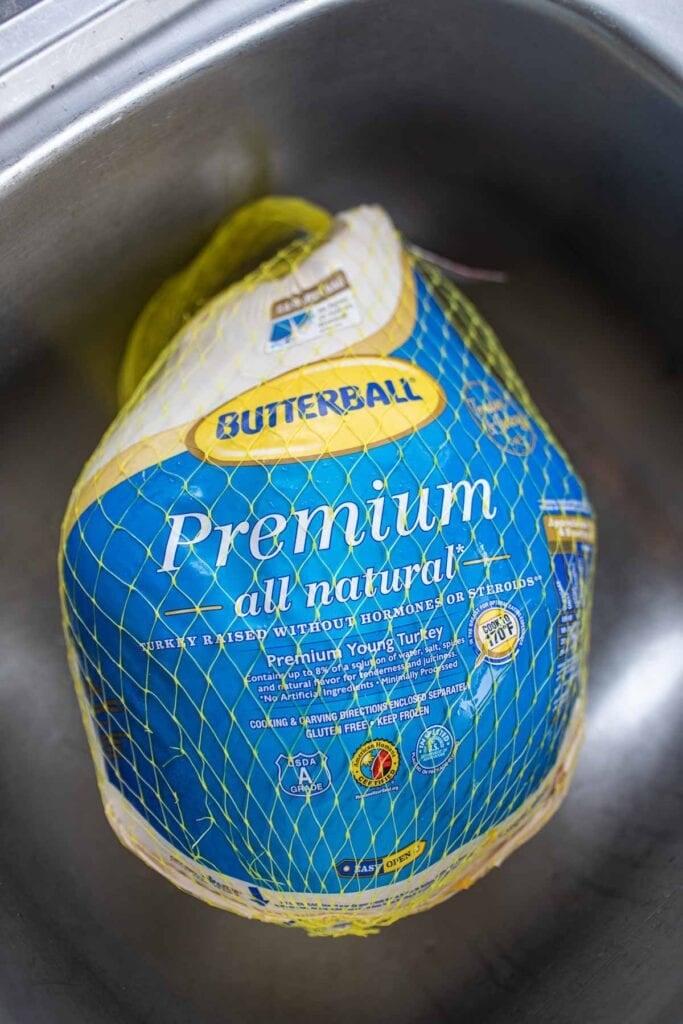
- Turkey. This recipe used a 12-pound frozen young turkey. A turkey weighing 11-14 pounds will work great for this recipe; it's even better if you have fresh turkey!
- Fresh Lemongrass. Use the bottom of a knife to smash it to help release oil
- Garlic. Smash all the garlic cloves before adding them to the brine, but do not crush them too much.
- Bay leaf. Use kaffir lime leaves if you have some. They add more Thai flavors. Skip this if you don't have any.
- Water. Use 20-22 cups of water or just enough to cover the turkey in the brine solution.
2. Marinating ingredients:
I’m using a mix of Thai sauces to make this turkey recipe extra special. Cooking a big bird like this is a once-a-year event, so I’m bringing out all the bold Thai flavors to make it unforgettable. You can find these sauces at Asian markets, but I’ve also linked to Amazon for convenience if they’re not available near you.
Here is a great set of sauces online. (Minus the black soy sauce), and you can use them for many of my other Thai recipes too!
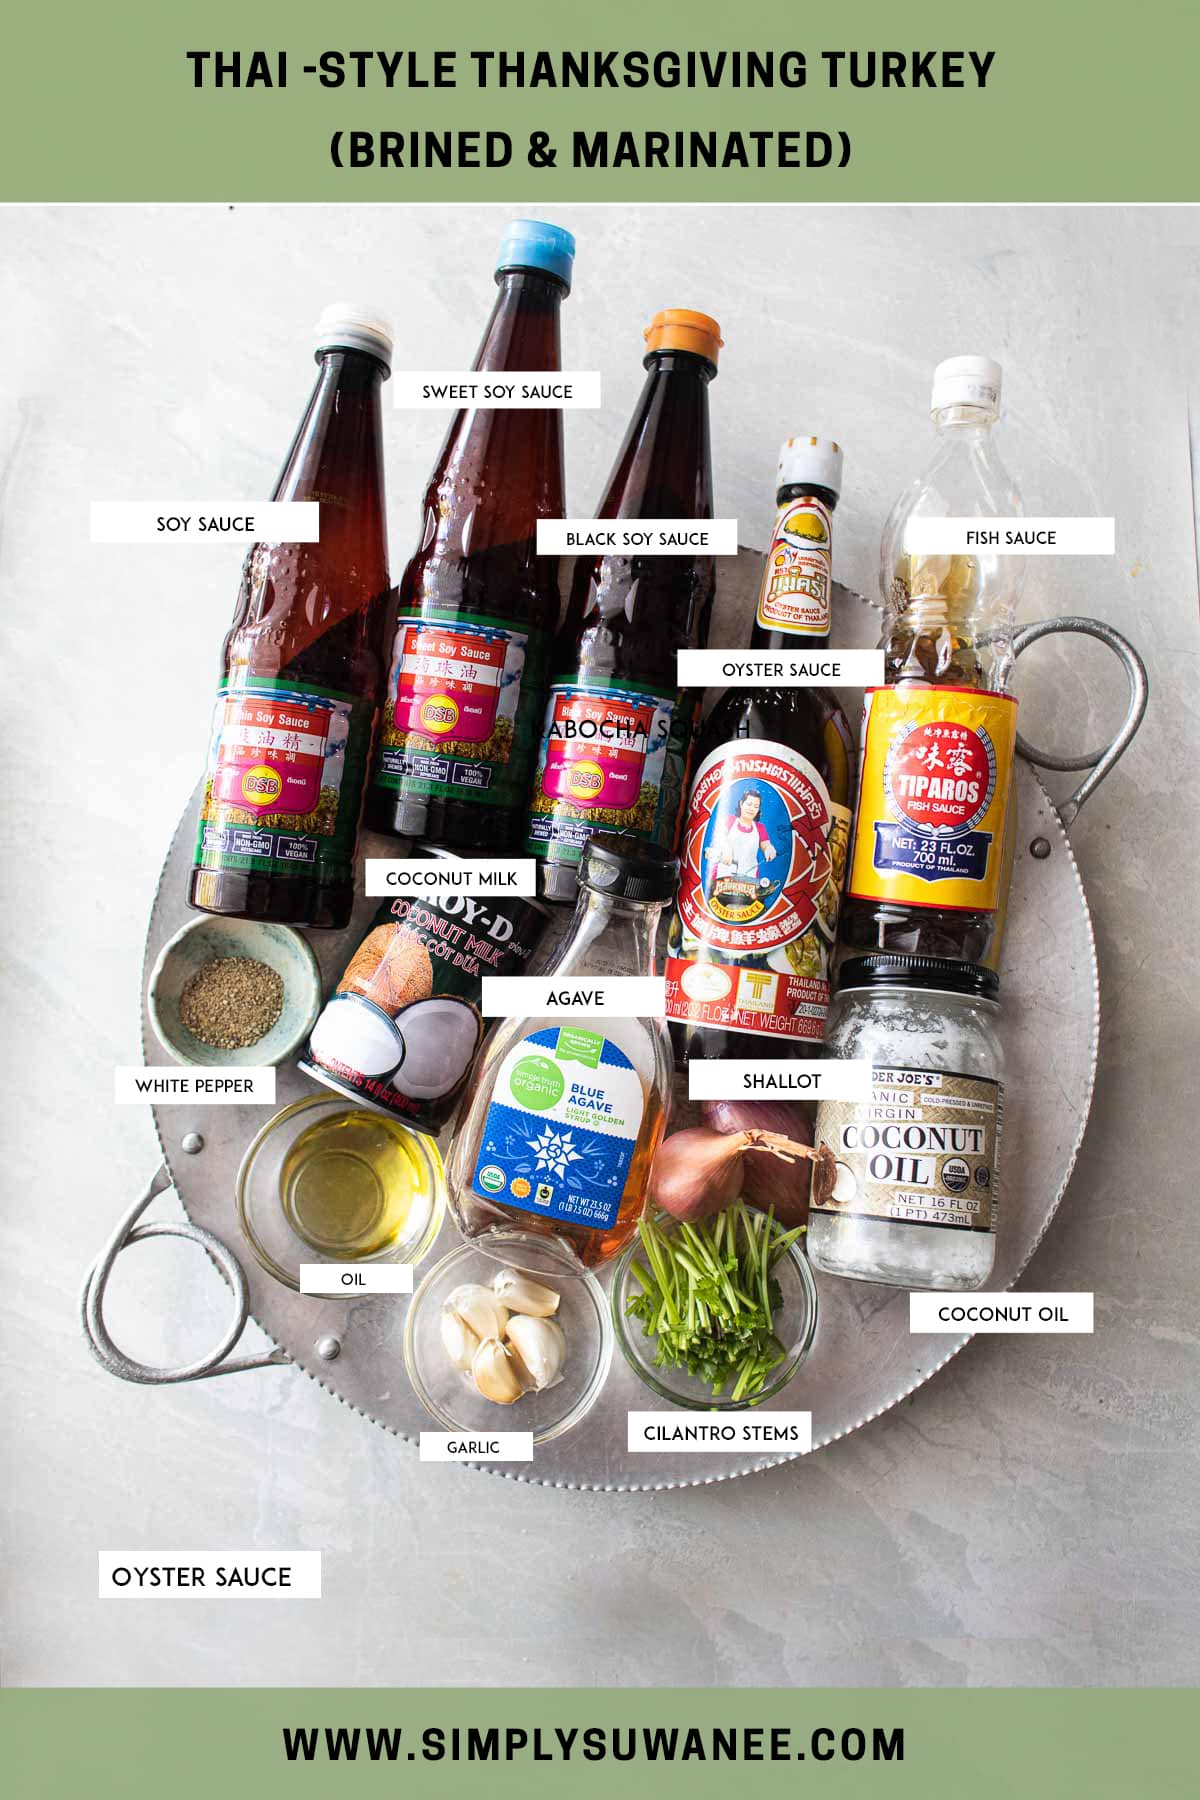
- Agave. Honey, white, or brown sugar can be substituted.
- Oyster sauce. One of the main sauces for this recipe. Don't skip out if you can help it. Here is a great set of sauces online. (Minus the black soy sauce) These same sauces can be used for my other Thai recipes too!
- Fish sauce. Fish sauce brands vary in saltiness. Adjust the sauce before marinating the turkey. You won't stay on the slightly saltier than expected because some of it will dissipate while roasting.
- Thai Soy sauce. You can use tamari as a substitute if you have a gluten allergy.
- Sweet soy sauce. Molasses can be used as a substitute. Mix in a little bit of maple syrup for extra sweetness.
- Dark soy sauce. Optional but highly recommended for the golden color on the outside of the turkey. In some brands, it's also called and labeled black soy sauce.
- Vegetable oil. To help keep the turkey from being too dry. Do not use olive oil, as it will change the flavors of the turkey.
- Ground white pepper. Ground white pepper tends to get spicy. Adjust to your level of heat preference. Black pepper is fine as a substitute.
- Shallot. Purple onion can be used as a substitute.
- Cilantro stems. Use the lowest parts of the stems where all the flavors are.
- Coconut oil. For rubbing on the skin before baking. Use unsalted butter as a substitute.
How To Make Thai Turkey
1. Brining the Turkey
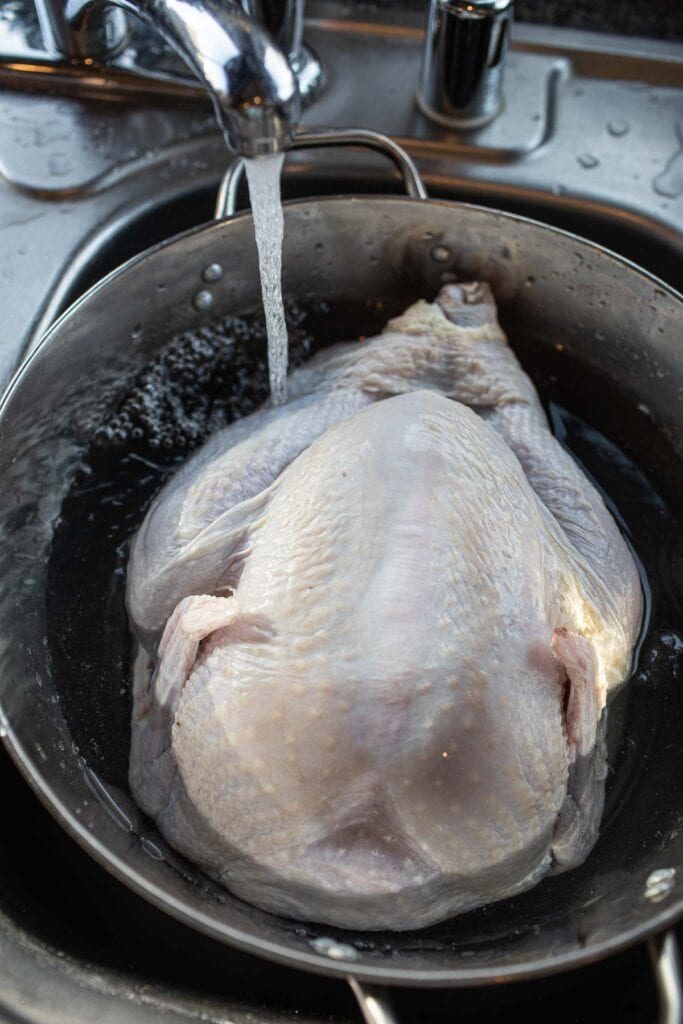
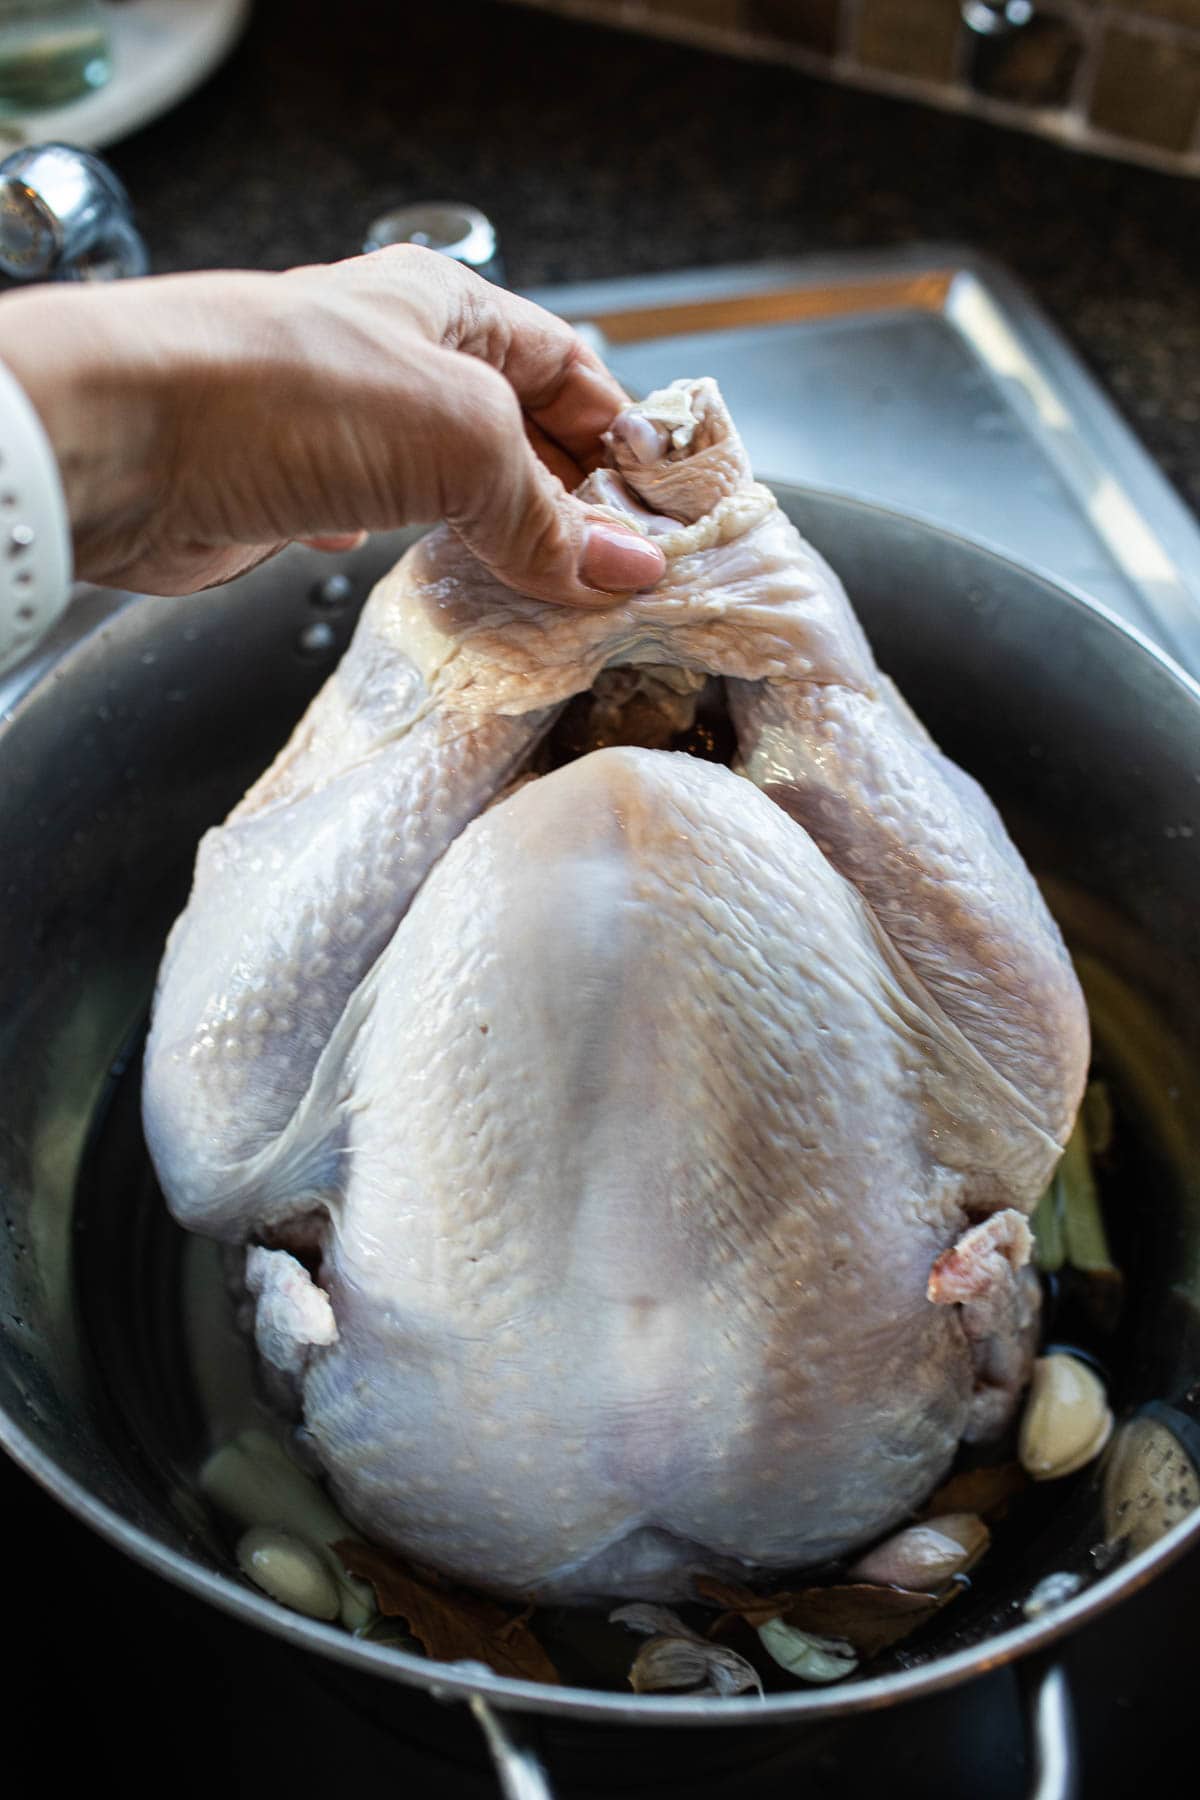
Step 1: Prep the Turkey. Thaw the turkey according to the package instructions, based on its weight. For example, my 12 lb turkey took about 3.5 days to thaw in the fridge. Once thawed, remove the packaging, giblets, and neck. Trim off any extra skin, fat, or unwanted parts, then rinse the turkey thoroughly with cold water.
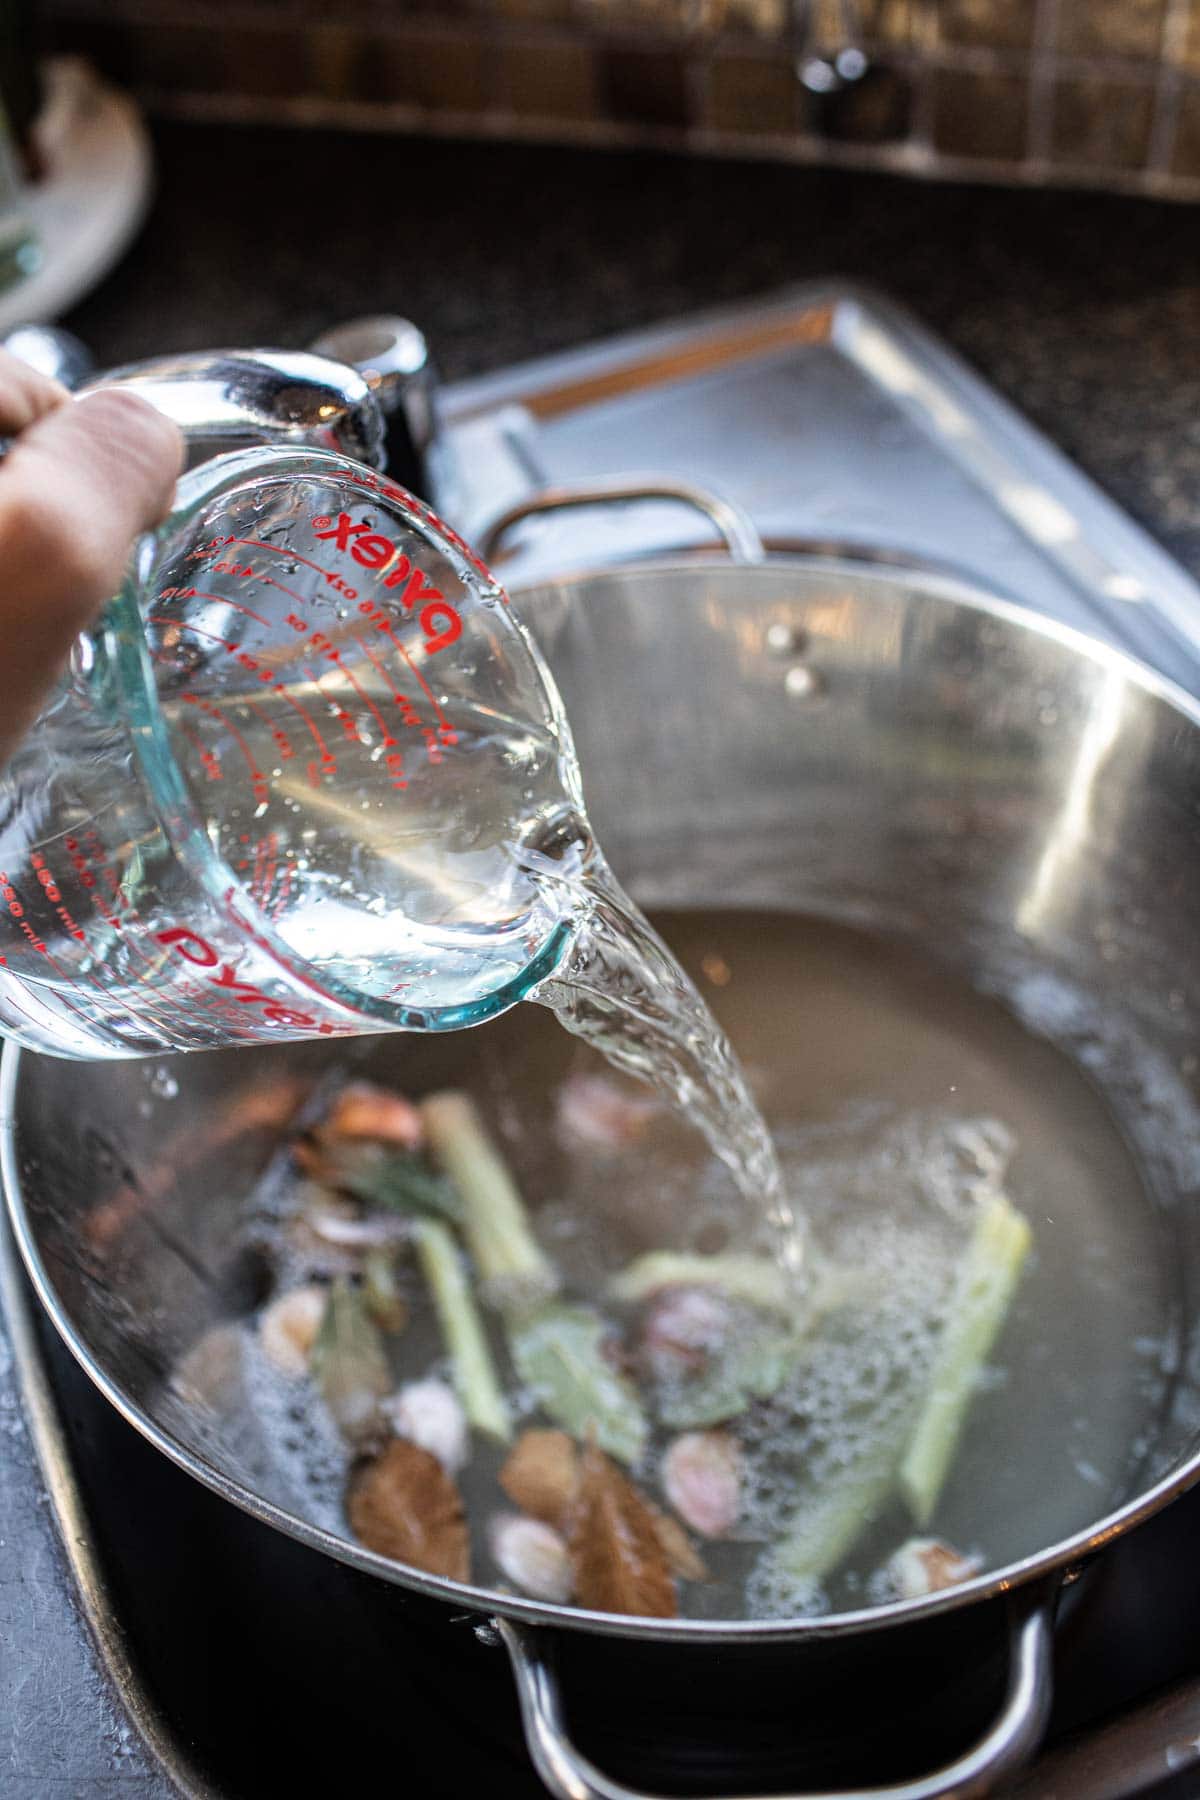
Step 2: Make the Brine. Bring 4 cups of water to a boil. While waiting, combine salt, smashed lemongrass stalks, garlic, and bay leaves in a large bowl. Once the water boils, turn off the heat and carefully pour the water over the aromatics in the bowl. Whisk until the salt mostly dissolves, then let it cool while you finish prepping the turkey.

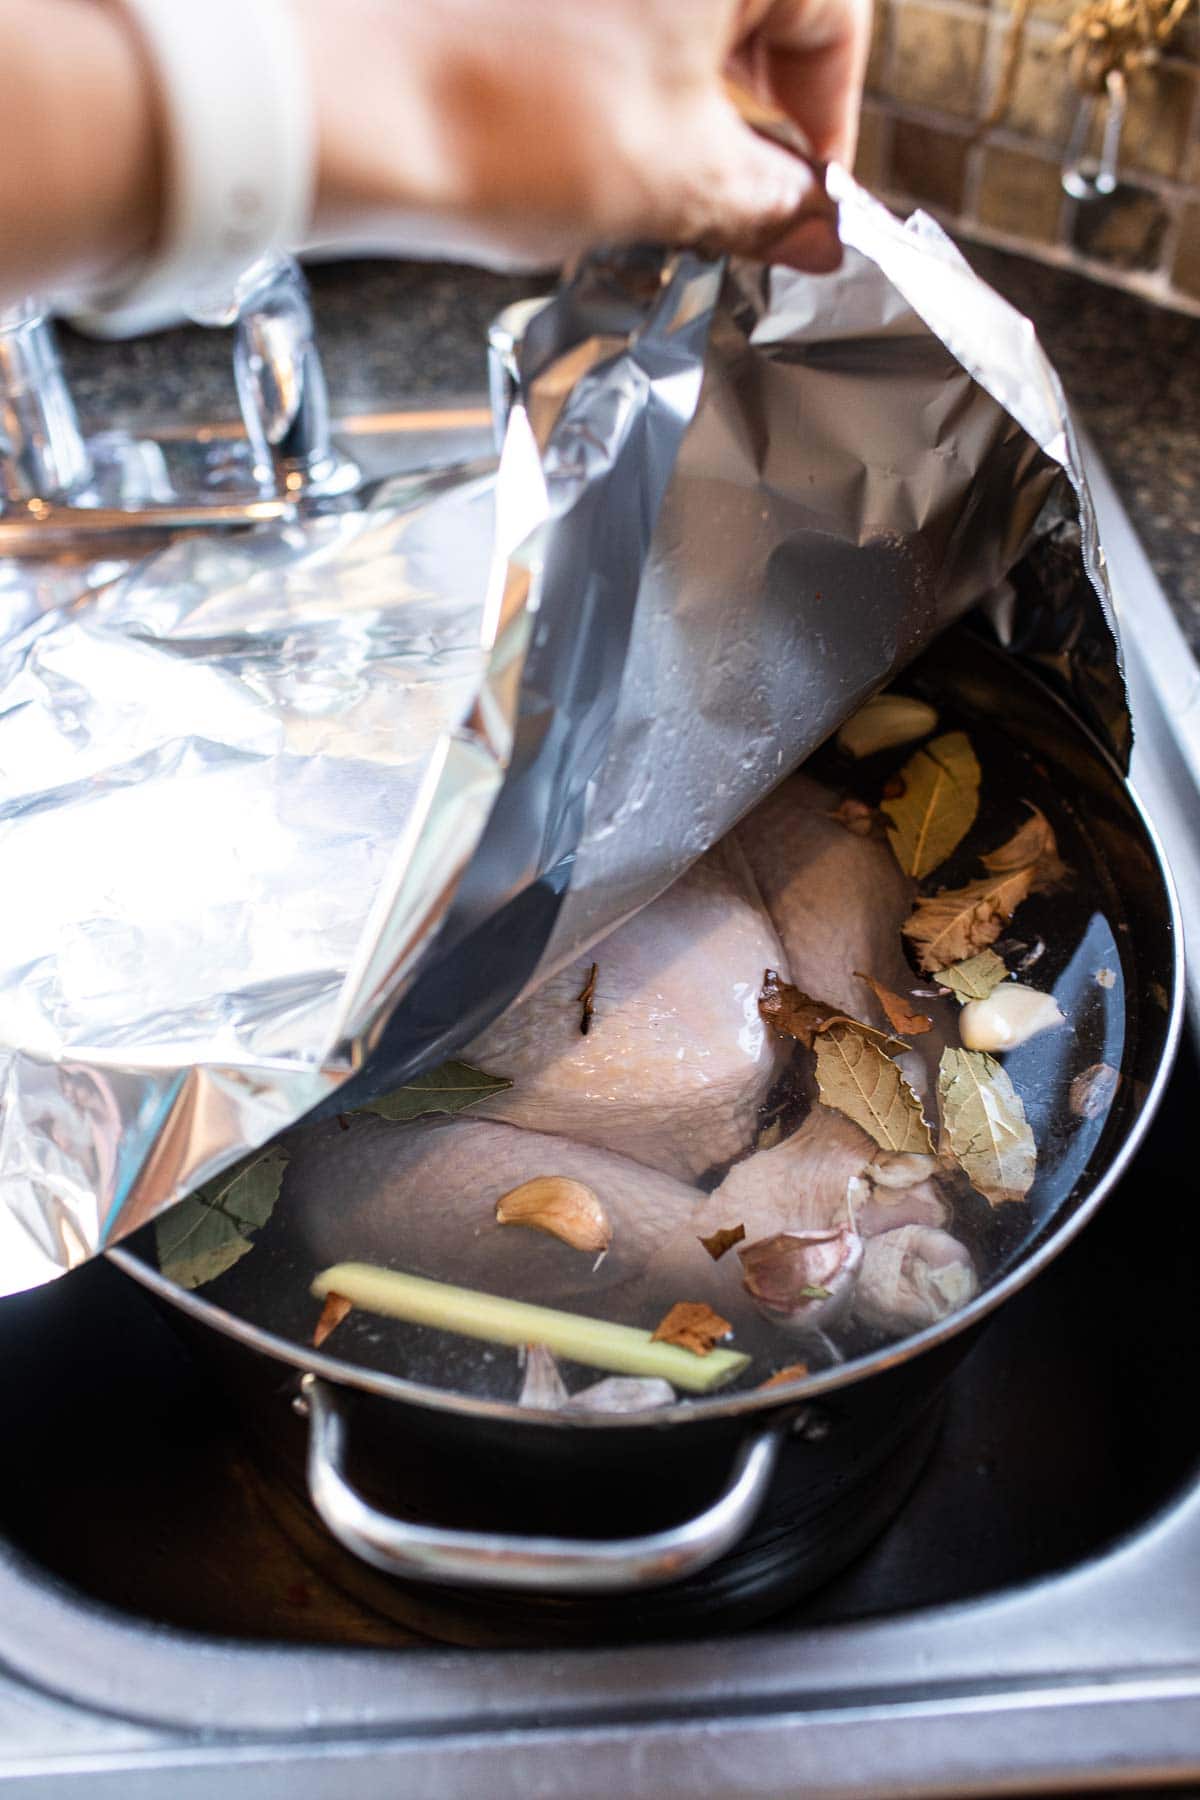
Step 3: Brine the Turkey. Add the cooled brine to a large container, then place the turkey in and add the rest of the cold water to submerge it fully (up to 2 extra cups if needed). Use a large container like a brining bag, stock pot, ice bin, or even a medium cooler. If your container isn’t big enough, check the notes for tips.
Step 4: Let it Brine. Cover the container tightly with foil or plastic wrap. Place the turkey in the fridge or in a cool spot under 40°F for 18–20 hours. If it’s cold where you live, you can leave the brining turkey outside safely.
Now we wait! (: Next is the marinating part!
2. Marinating Your Turkey
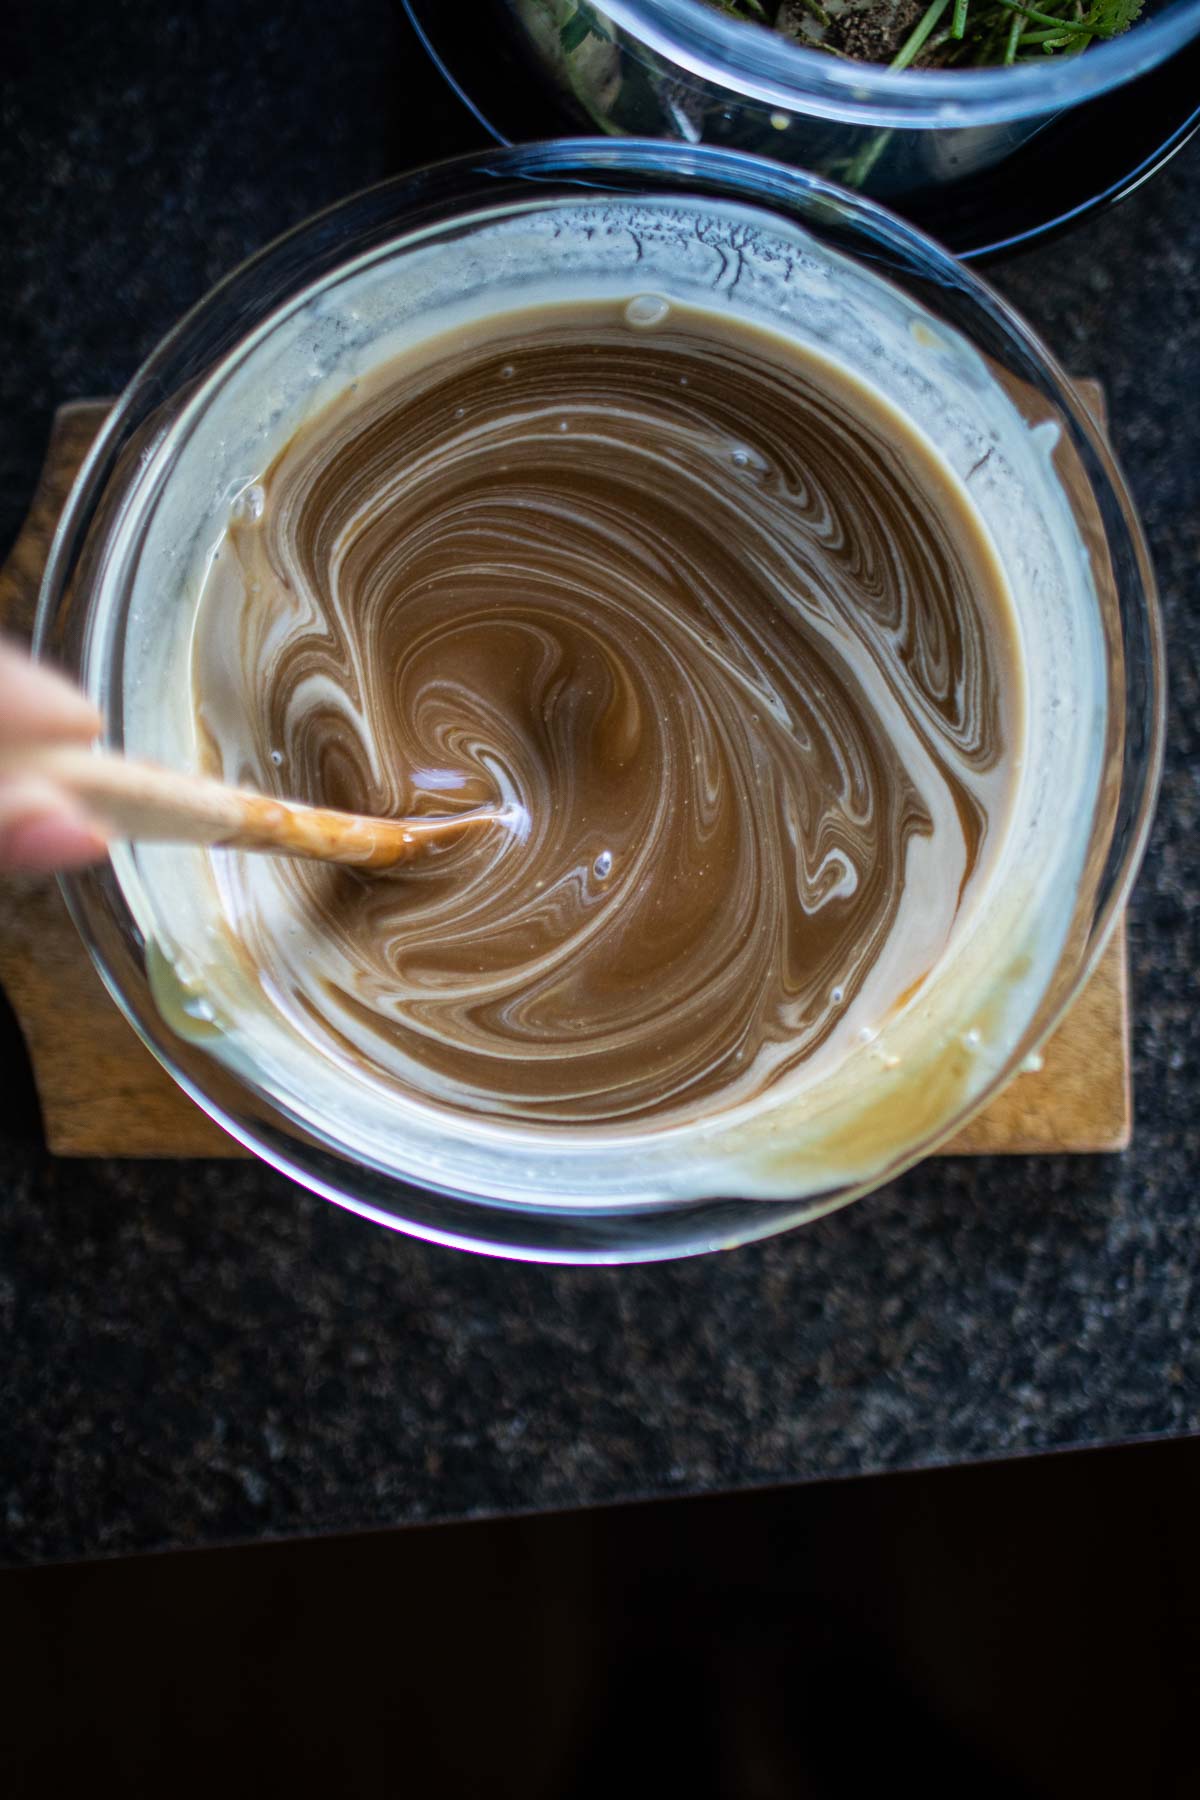
Step 1. Let's roll up our sleeves and get this Thai turkey going! Combine all the sauces, coconut milk, agave, and oil in a medium bowl and whisk gently together. Set aside.
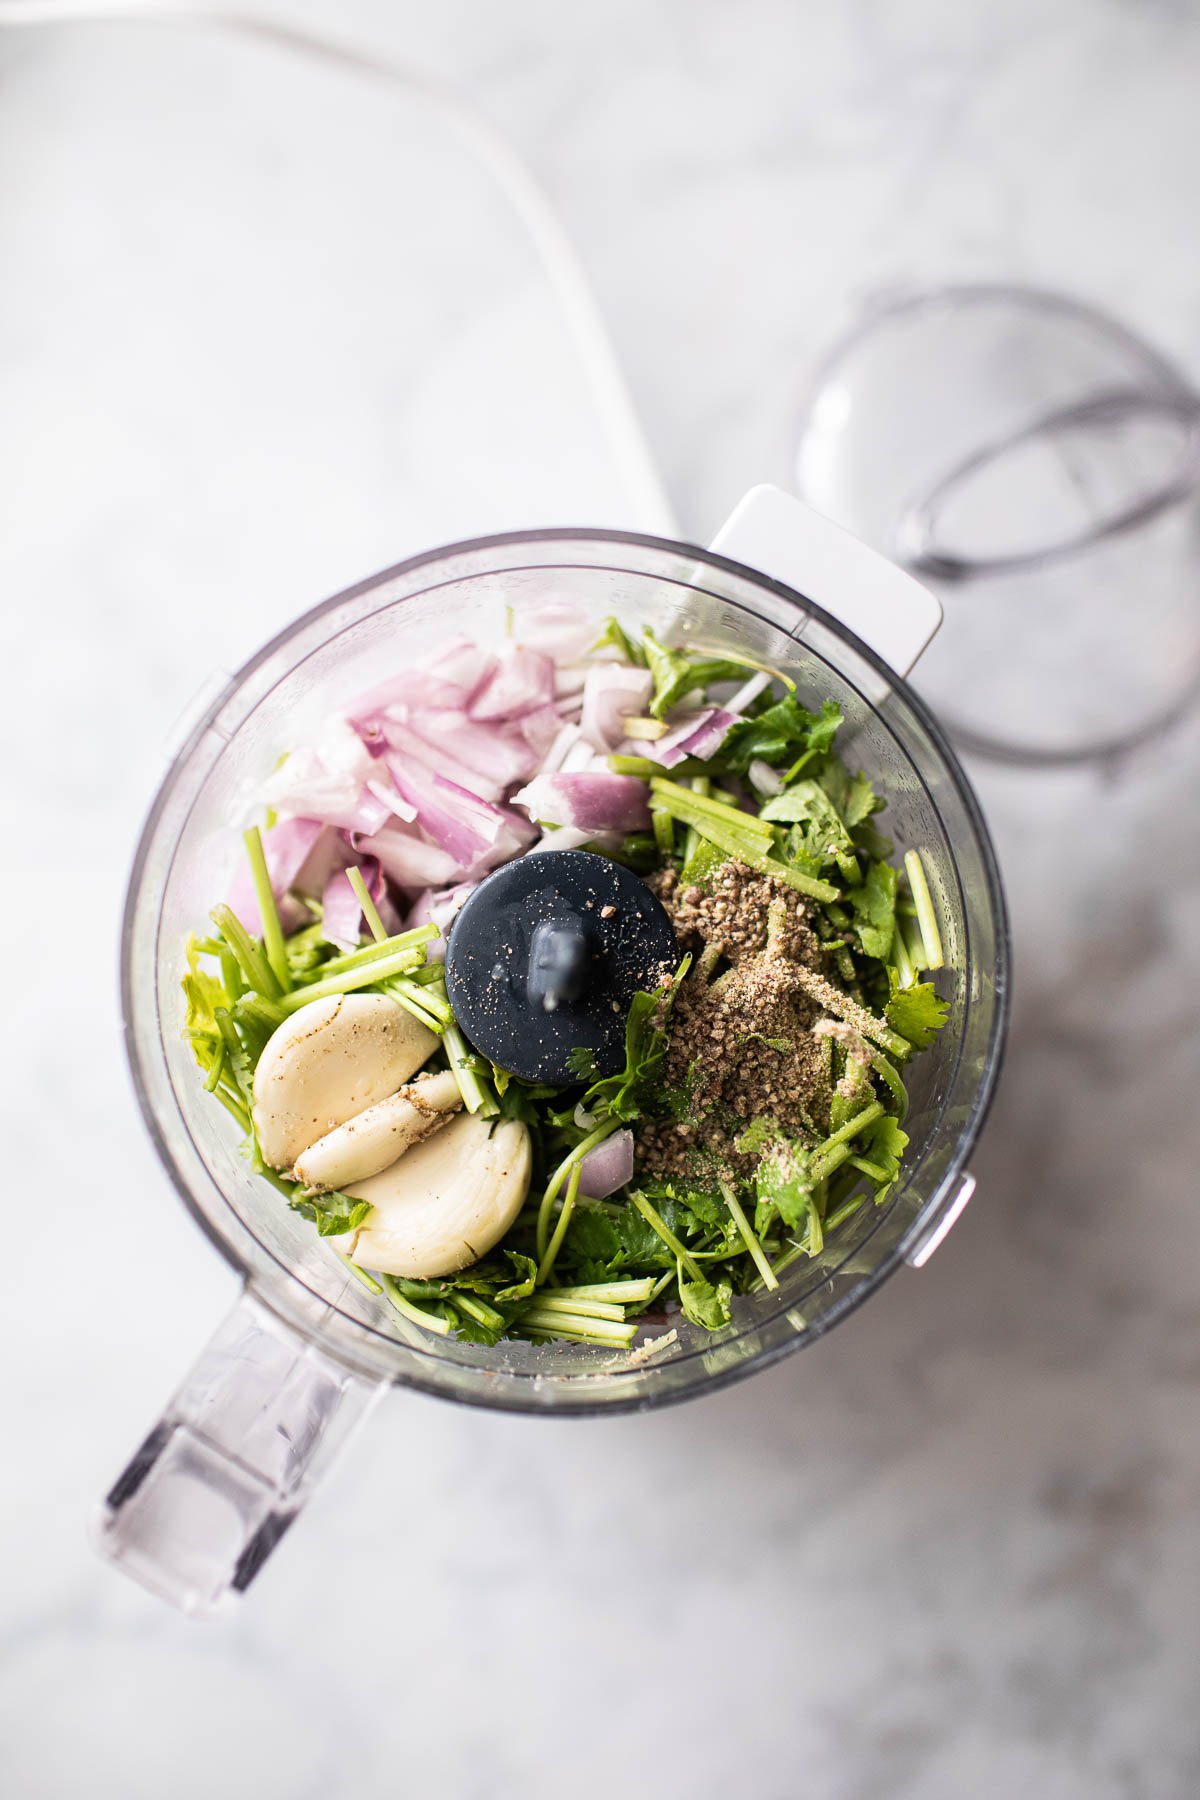
Step 2. Add cilantro stems, garlic, shallot, and ground white pepper to a small food processor. Add ⅓ cup of the marinating sauce to help turn the blades and blitz until smooth. Use a stone mortar and pestle if you have one. If not, chop everything really small into fine pieces.
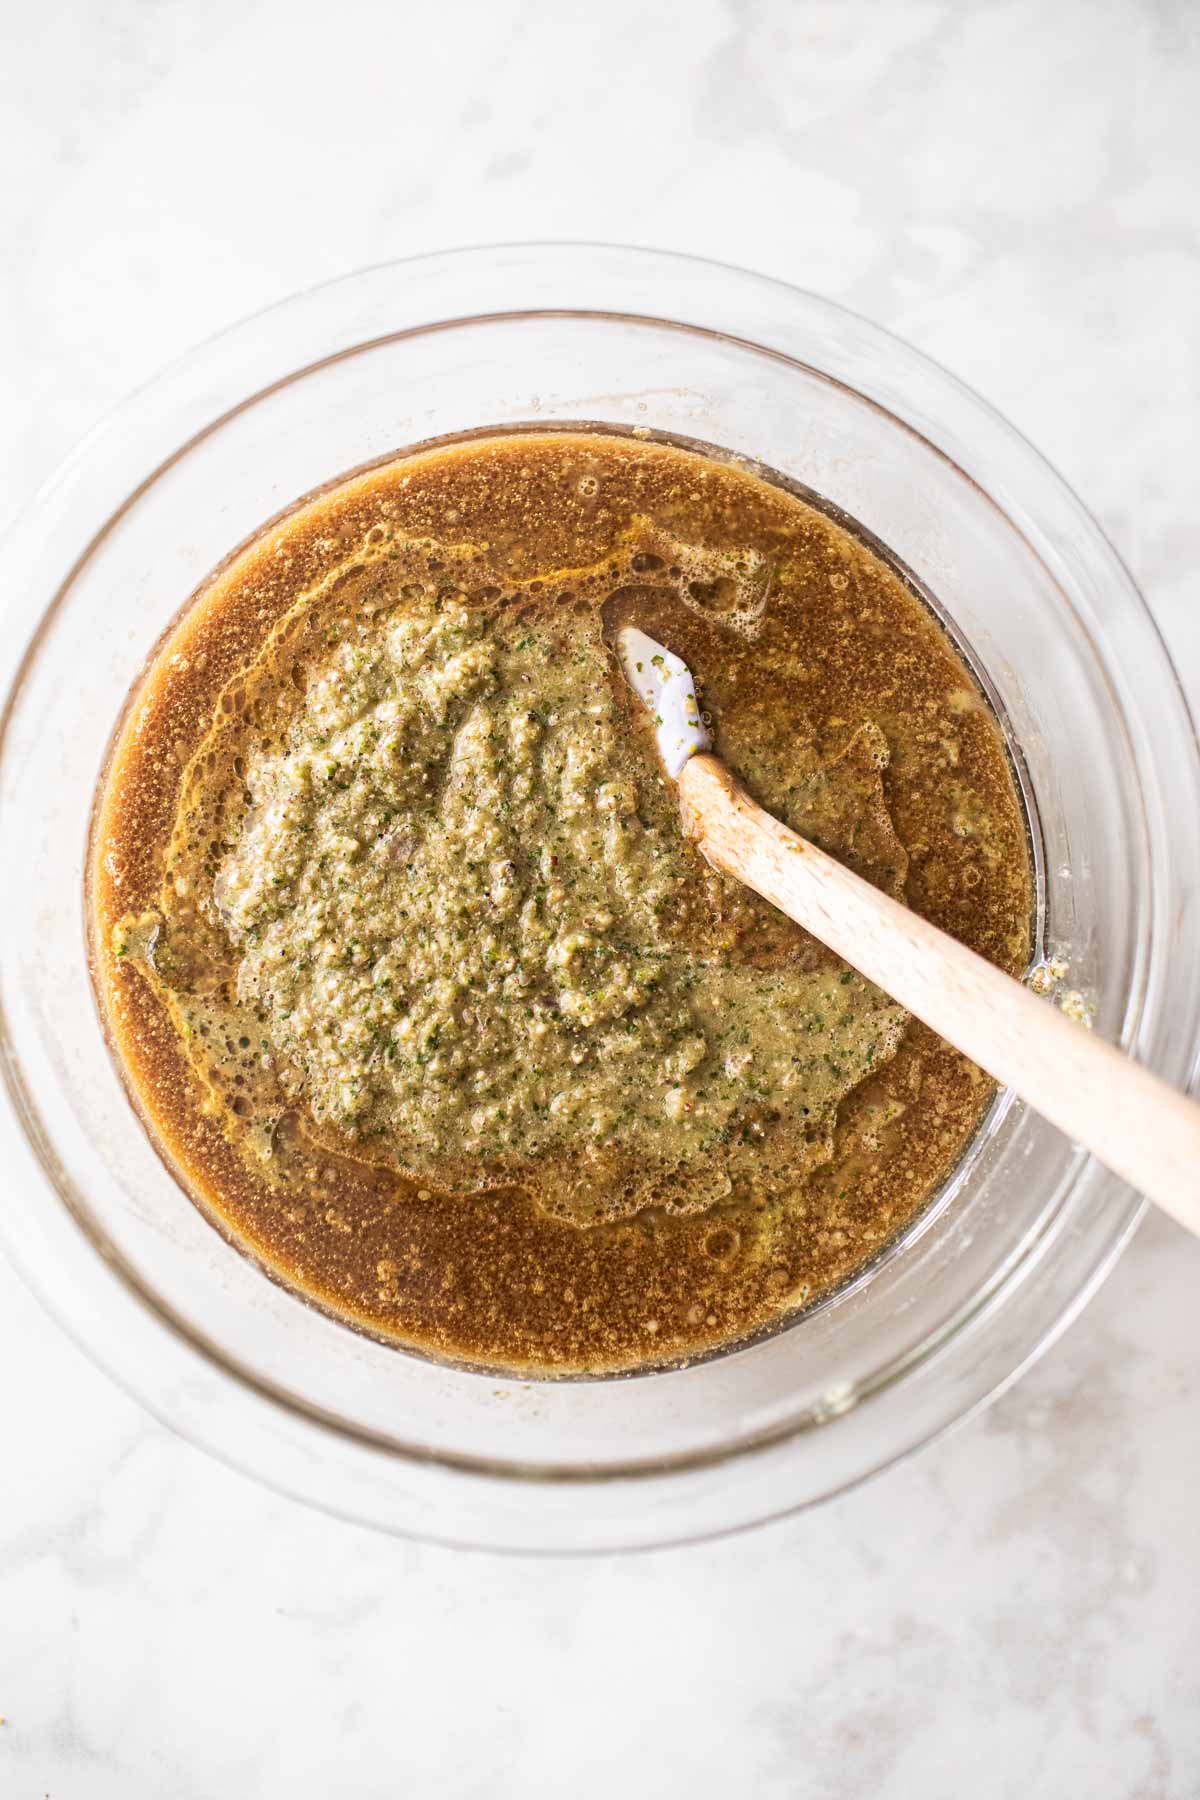
Step 3. Combine the paste into the sauce bowl and whisk well. Get ready to marinate the turkey next!
Step 4. Remove the turkey from the brine water. It is easiest to drain the brine water from the turkey inside the sink, then wash it quickly with cold water for a few seconds. Pat dry with paper towels.
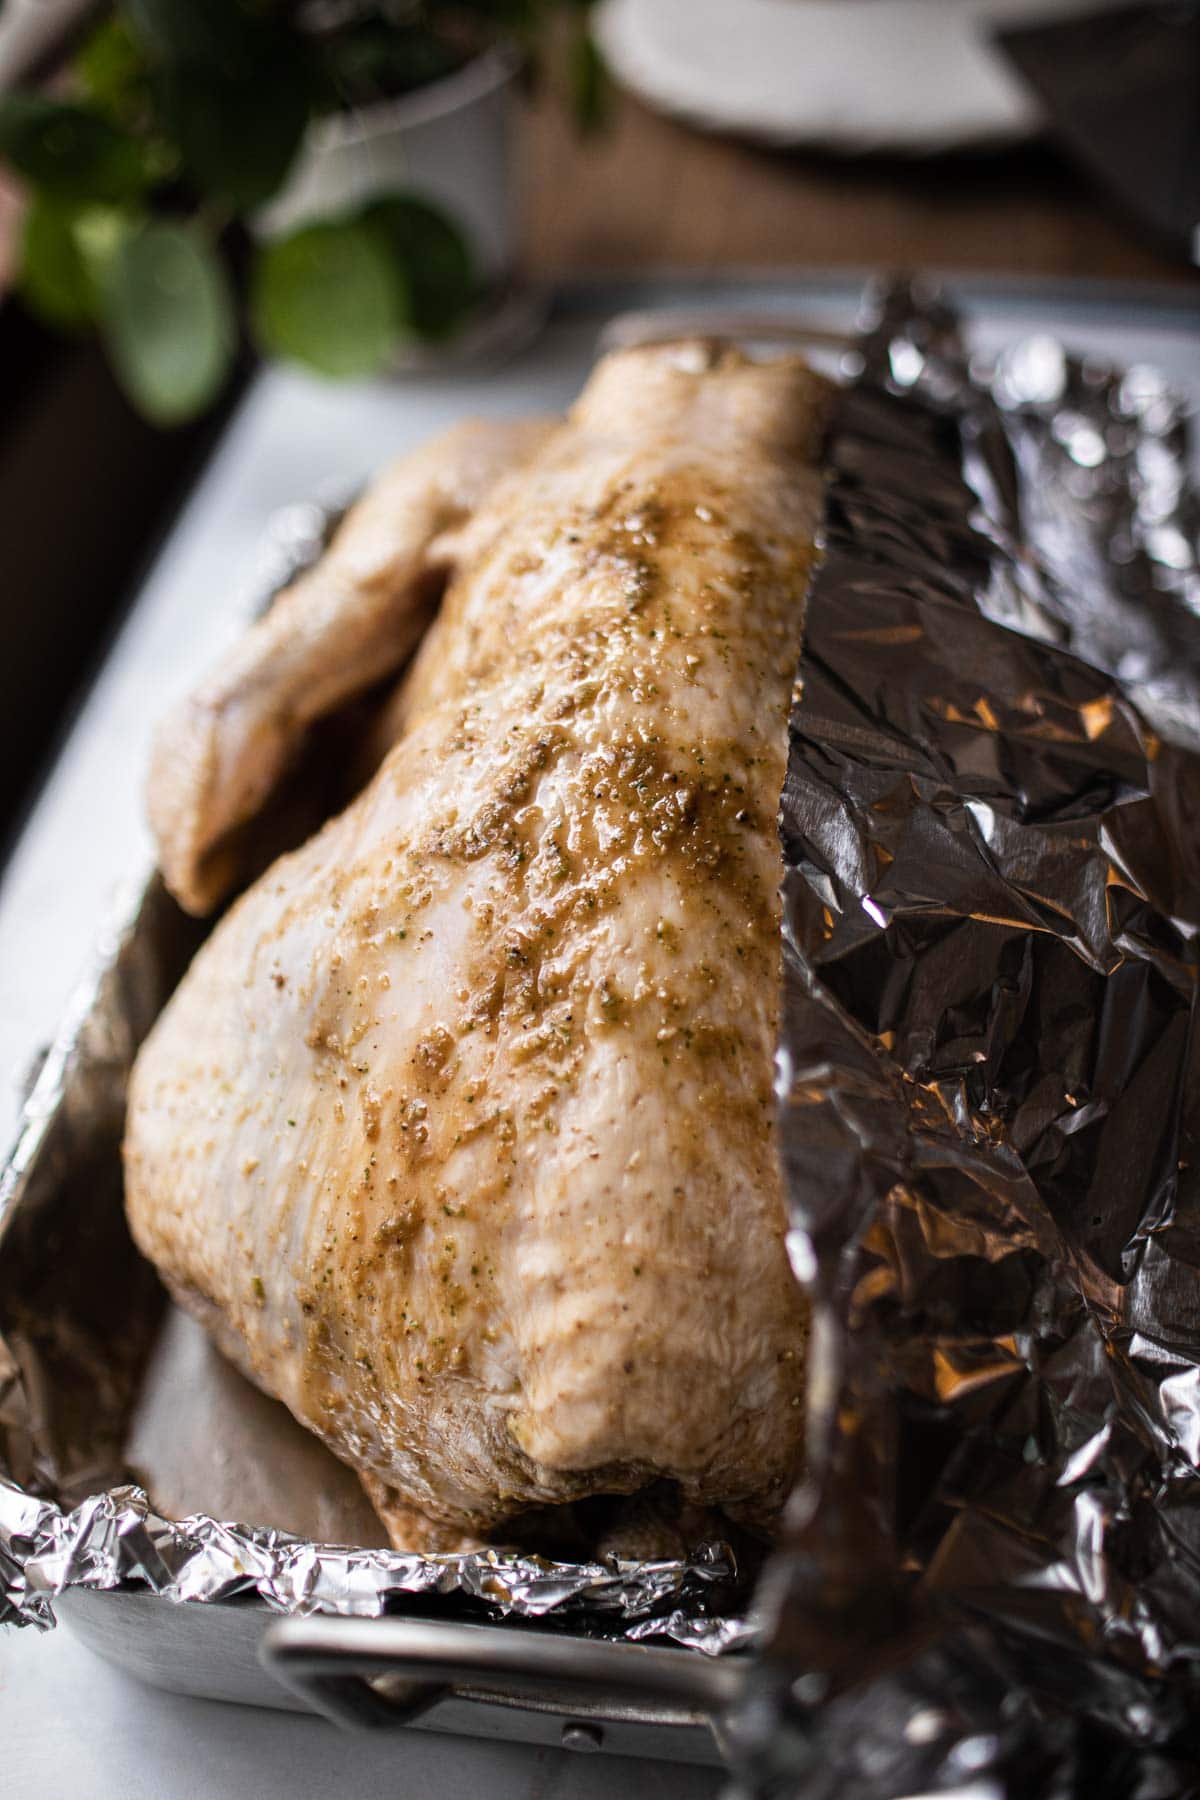
Step 5. Line a roasting pan with a sturdy baking sheet and place your turkey on top. Pour the marinade all over, making sure to get it into every nook and cranny—inside the cavity, around the wings, everywhere! Carefully flip the turkey to coat all sides. Note. Save about ¼ of the marinade for basting later, or scoop some from the pan as you rotate the turkey while roasting.
Step 6. Place the turkey breast side down so the marinade soaks into the breast meat, keeping it juicy and flavorful. Cover the pan with foil and pop it in the fridge to marinate for at least 5 hours. Up to 12 hours is even better! Be sure to turn the turkey once or twice while it marinates so it gets evenly coated.
3. ROASTING YOUR THAI TURKEY!
Step 1. Take the turkey out of the fridge and let it sit at room temperature for up to an hour before roasting. Preheat your oven to 325°F.
Step 2. Give the turkey one last coat of flavor by scooping up the marinade from the bottom of the pan and pouring it all over. Transfer the turkey to a cutting board temporarily, then place a roasting rack inside the foil-lined pan to lift the turkey off the bottom during roasting.
Note: I used the same pan for both marinating and roasting. I left the rack out while marinating, then added it before placing the turkey back into the pan for roasting. It worked perfectly!
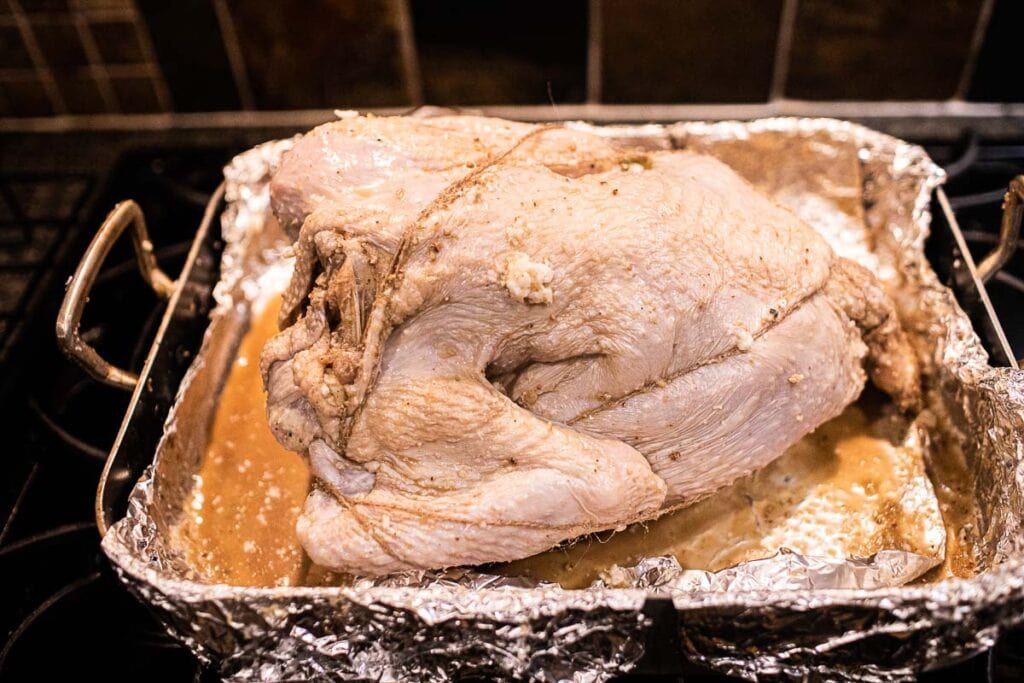

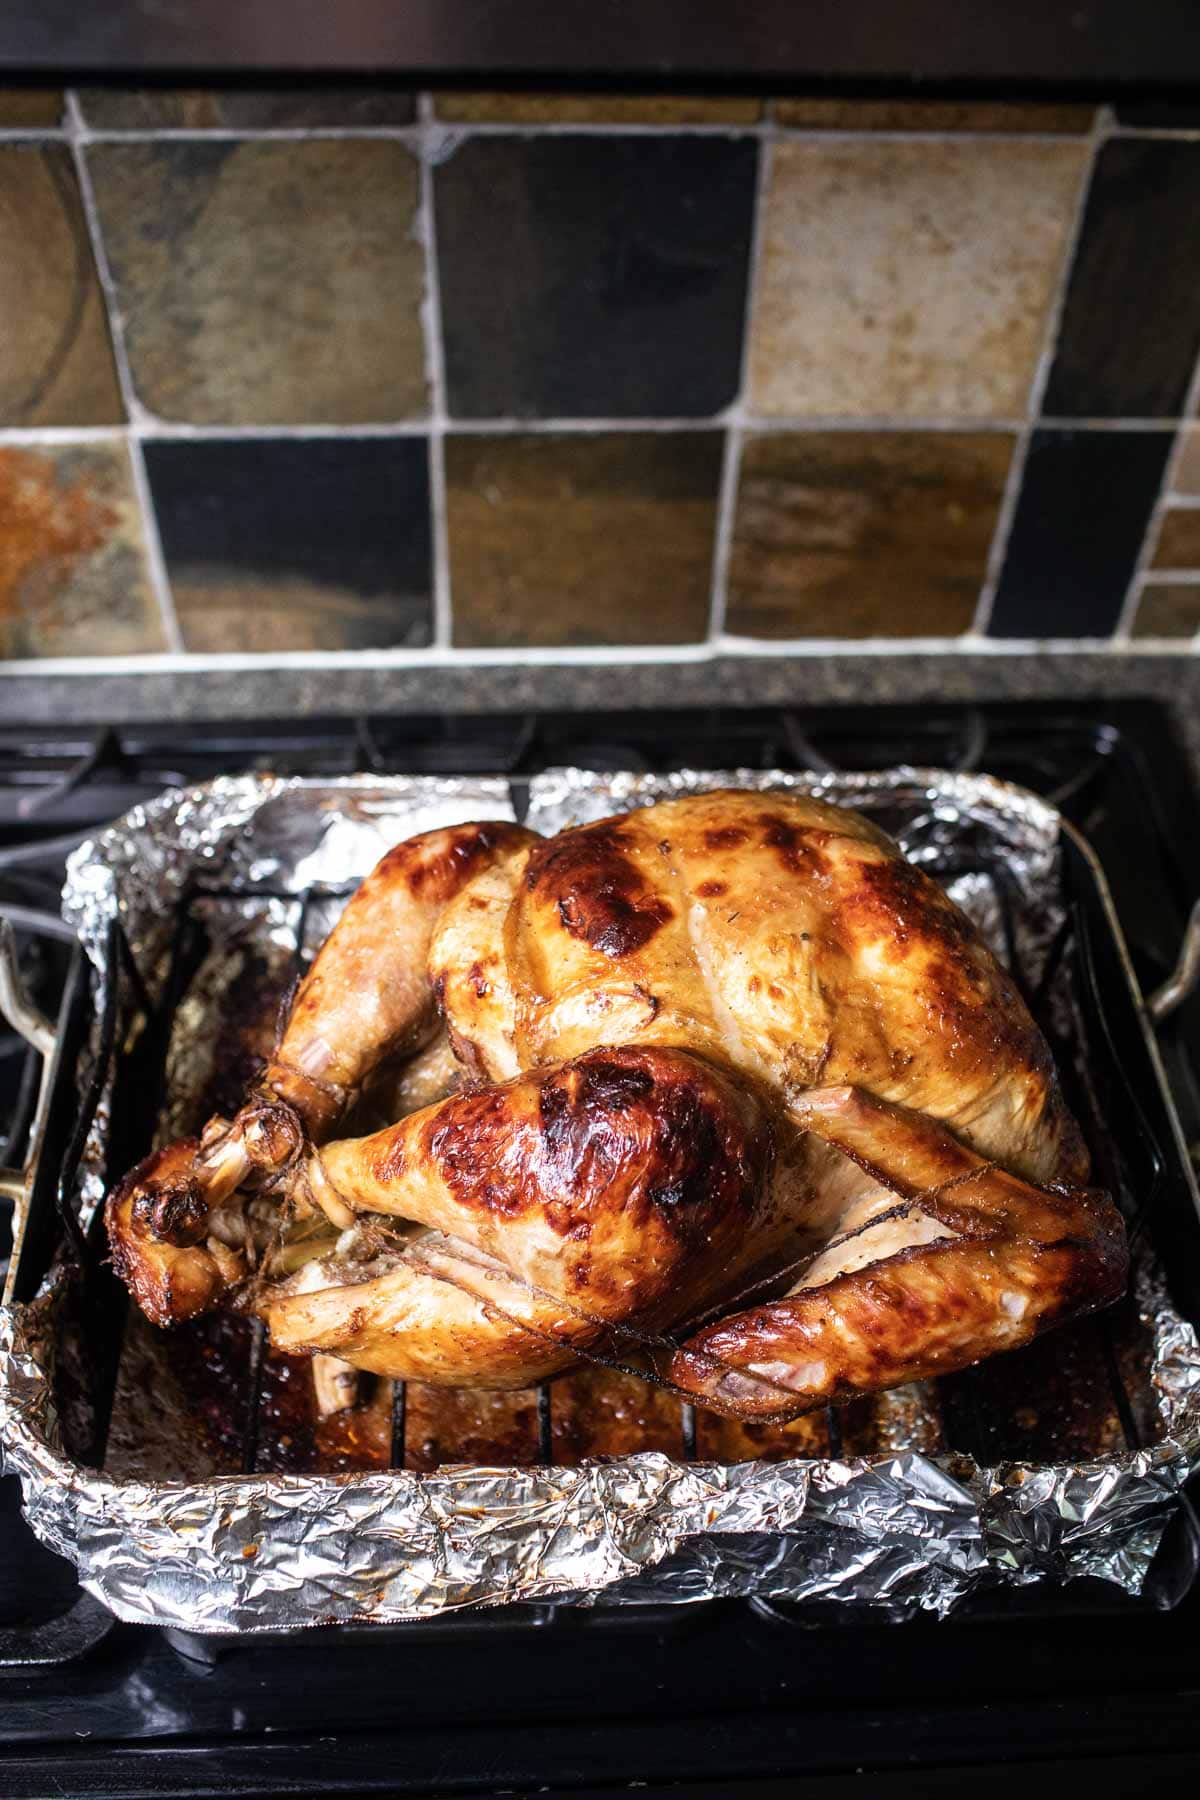
Step 3. Rub ¼ cup of coconut oil under the turkey skin and all over the outside. Be gentle to avoid tearing the skin. Tuck the wings under and truss the turkey with kitchen twine to keep it compact while roasting. Place the turkey breast-side down to allow the fat to drip into the drier breast meat for extra juiciness.
Note: Trussing means tying the legs together and tucking the wings close to the body. This helps the turkey cook evenly, keeps the stuffing in place, prevents burning, and gives it a nice shape.
Step 4. Adjust your oven rack if needed, then place the turkey on it and roast at 325°F for 3-4 hours, or until the thickest part reads 165°F on a meat thermometer. Larger turkeys may take longer, so check your roasting guide for exact times.
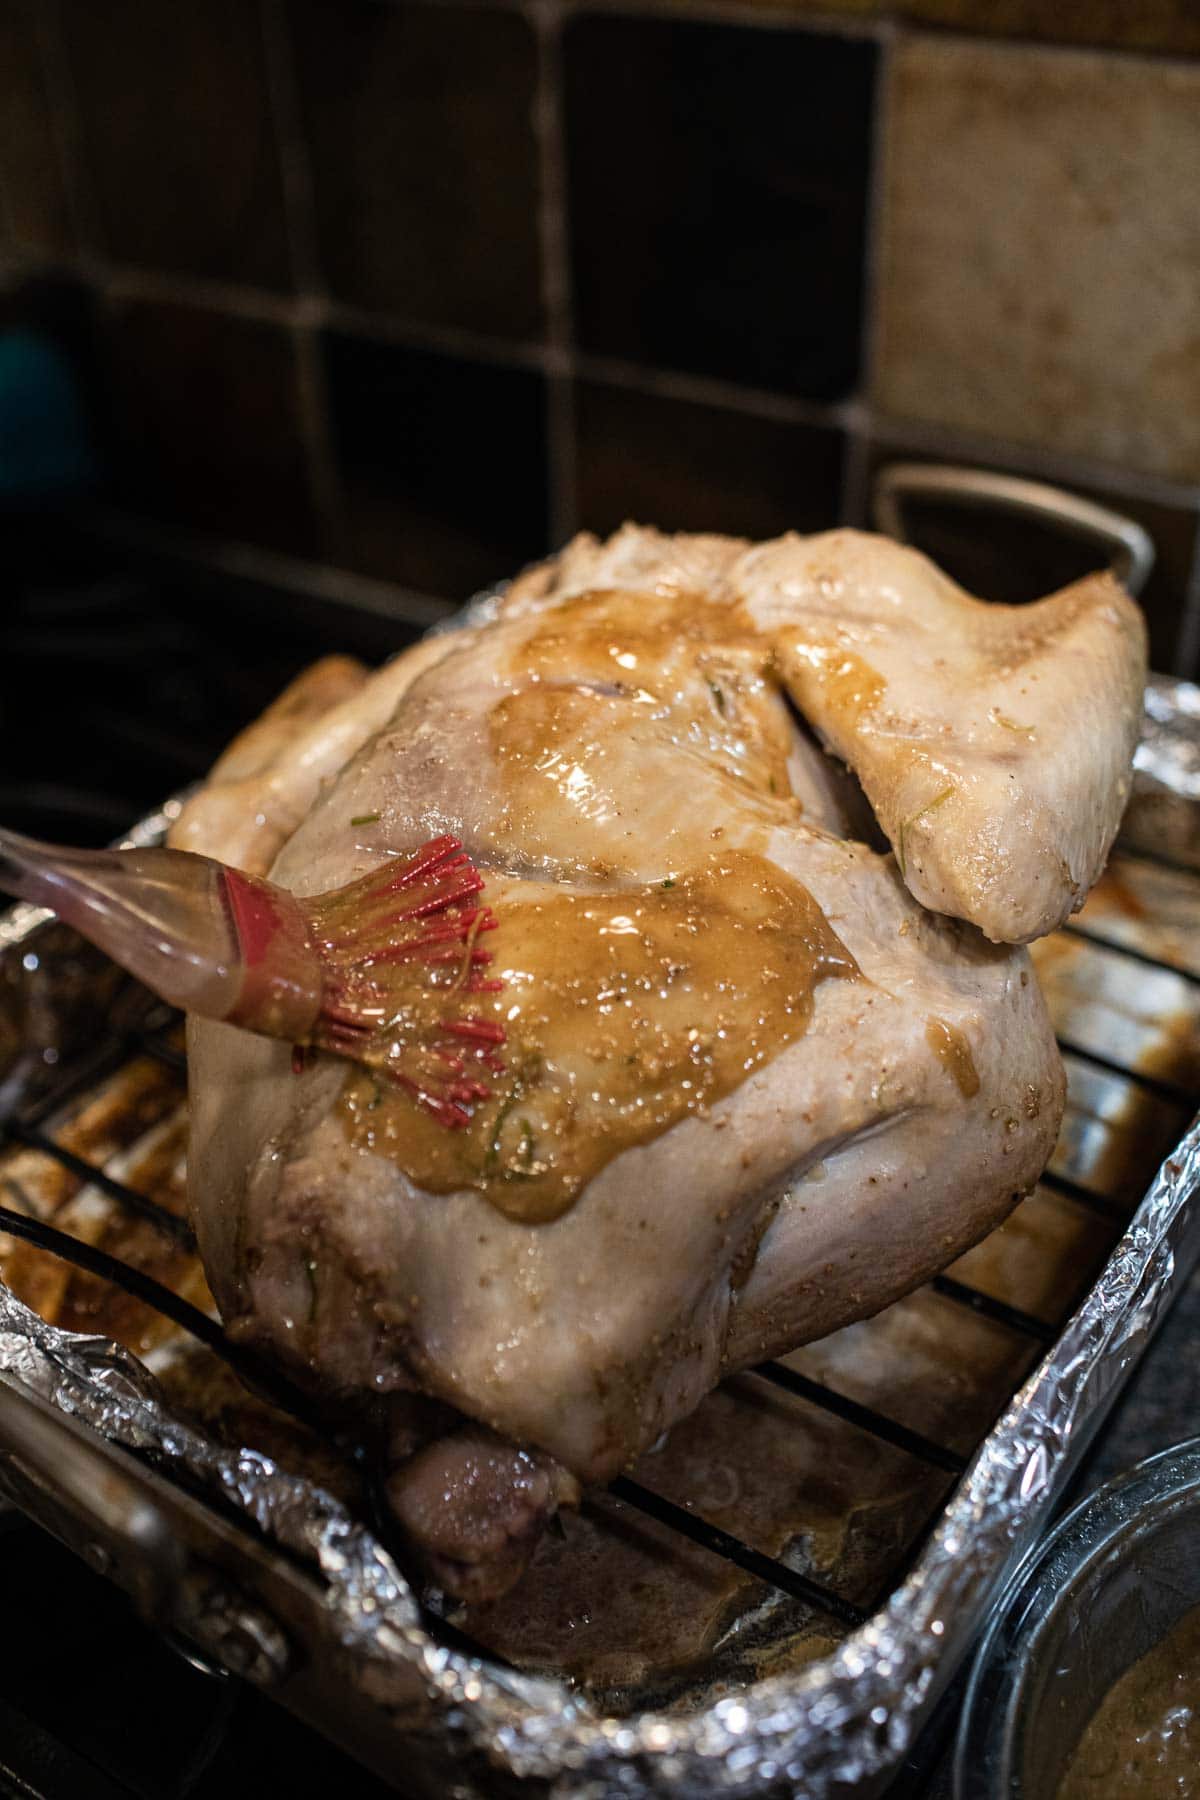
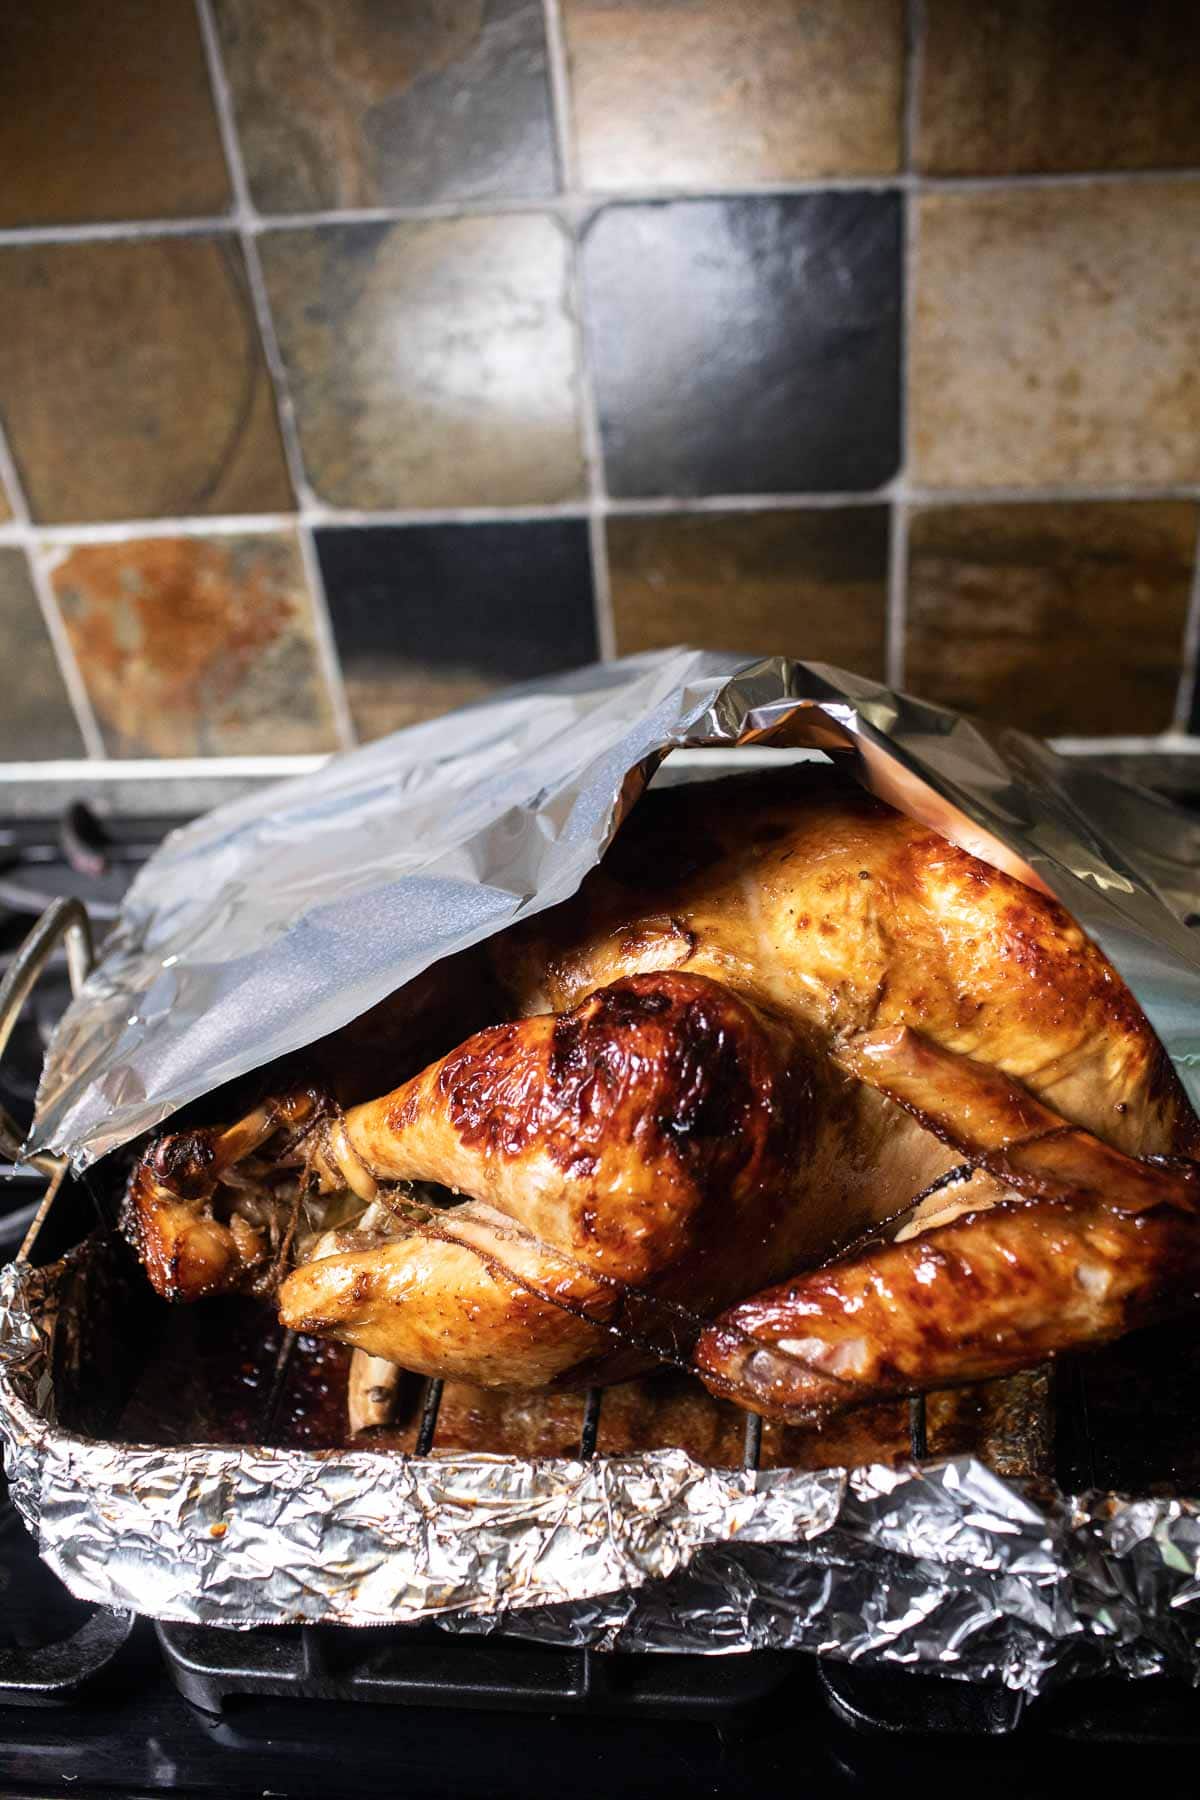
Step 5. After the first hour, carefully remove the turkey from the oven and brush it with the marinade. Turn the turkey breast-side up for the rest of the cooking. Be careful with the high heat!
Step 6. With the breast side now up, brush it with more marinade and add ½ cup of water to the bottom of the pan to keep things moist. Return the turkey to the oven.
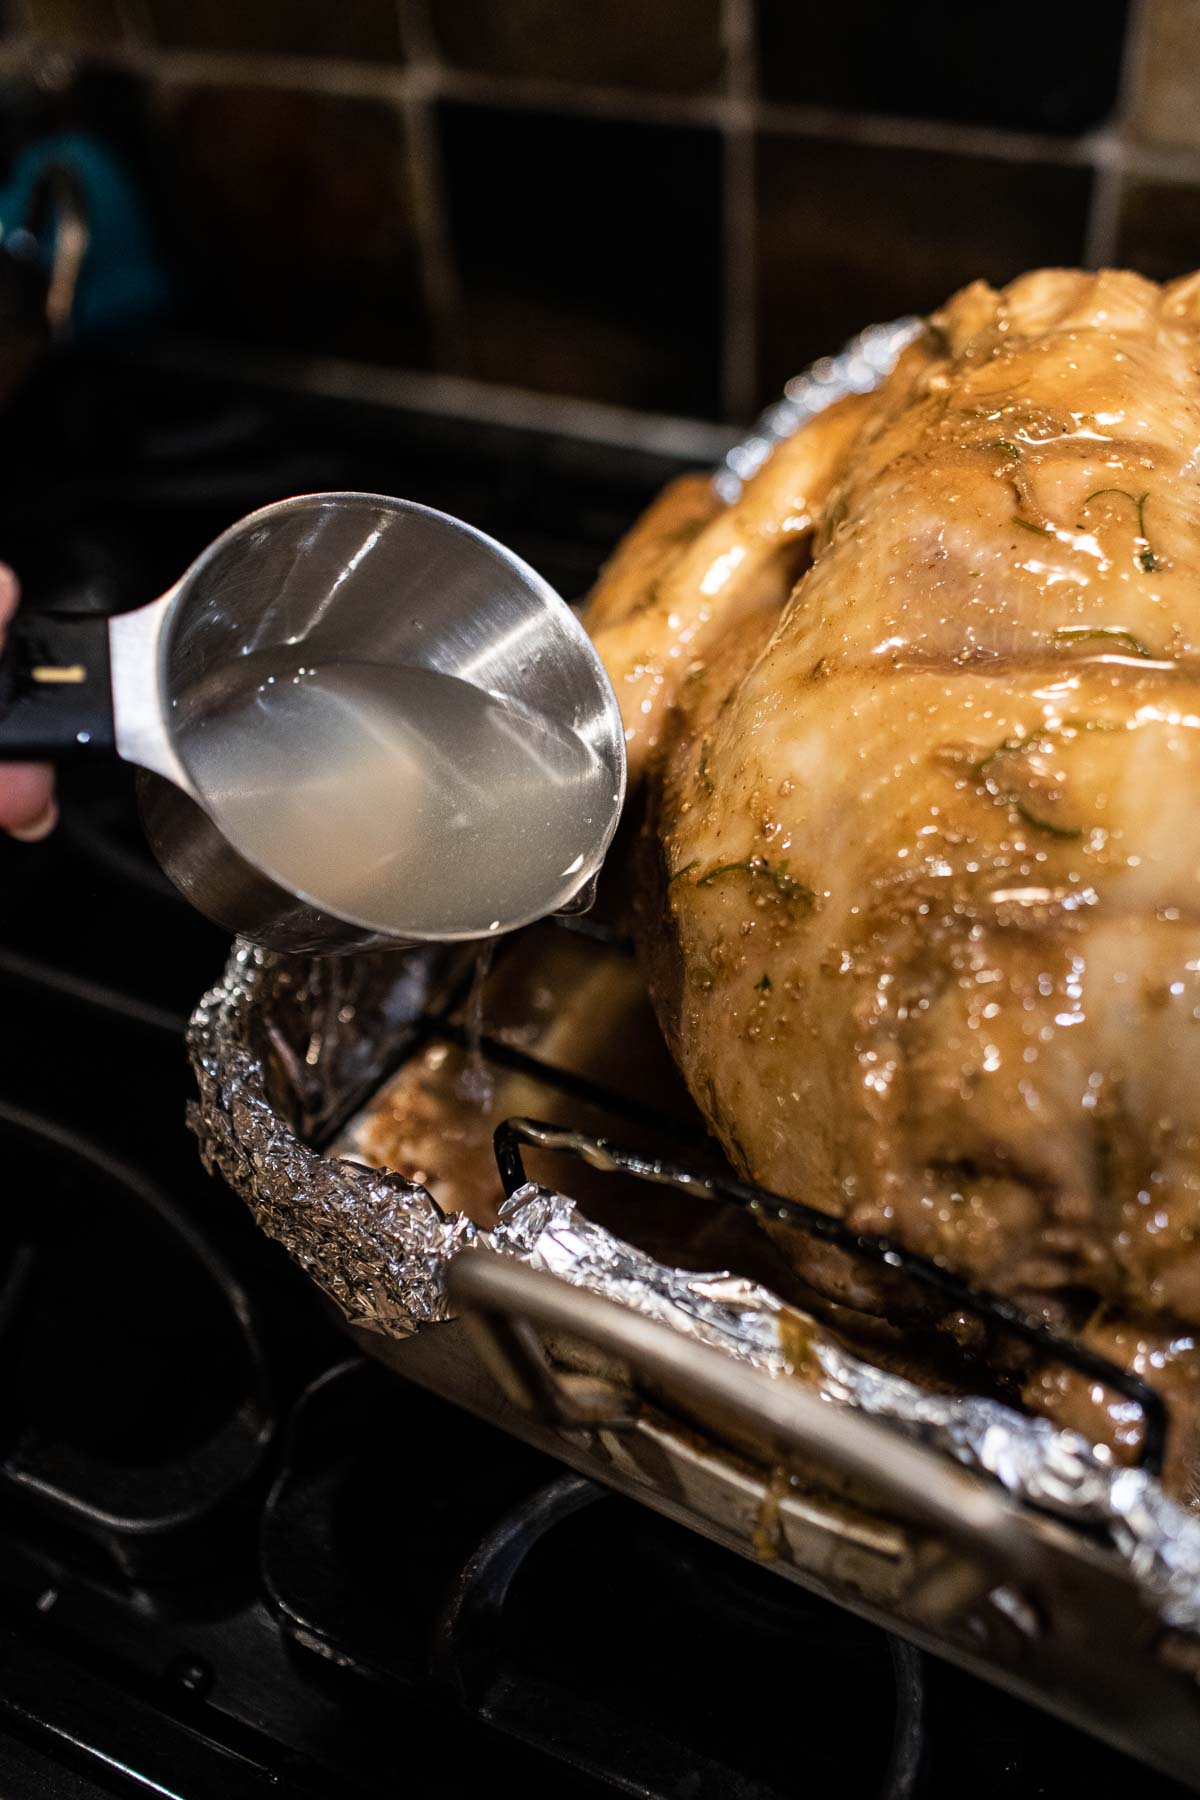
Step 7. Check the turkey every hour, basting with more marinade and adding ½ cup of water to the pan if it looks dry. If the skin starts to brown too quickly, loosely cover the turkey with foil.
Step 8. When the timer goes off, use an instant-read thermometer to ensure the turkey is cooked—165°F in the thickest part of the breast. Let the turkey rest for 20 minutes before carving. Save the pan drippings to use as a dipping sauce. Enjoy!
Serve your turkey any way you like but here are some of my favorite sauces to pair with it you'd like more Thai flavors in your turkey. Nam Jim Jaeow recipe without sugar (using honey instead), Thai sweet chili dipping sauce, Thai Roasted Gai Yang chicken recipe, 5-minute authentic Thai satay sauce.
Helpful Kitchen Notes and Expert Tips
- Use a very large container for brinning. I used an ice bucket for mine, but you can use anything available. A medium-sized cooler could work, too. A brining bag is also helpful!
- While roasting, keep a close eye on the bird and check every hour or so, without opening the oven, to see how it’s looking.
- If the skin starts to brown too soon, use regular aluminum foil to loosely cover the turkey.
- If the wings or any smaller parts of the turkey start to burn too quickly, wrap a small piece of foil around those parts to help them not get burned by the high temperature.
- Save the bones to make Tom Yum turkey bone broth or turkey pho broth.
- The best way to flip the hot turkey is to use kitchen mitts or a clean dish cloth, hold the drumstick stick while supporting the base with the other hand, and carefully lay it back onto the baking pan rack. You might need an extra hand for a larger turkey.
Helpful Kitchen Tools for Making Turkey
- Meat thermometer, brine bags, Ice bin, a large pot for brining, roasting pan, heavy-duty aluminum foil, saran wrap, basting brush, oven mitts.
Have lots of left over turkey meat and bones? I know you would so I created even more these Thai recipes using leftover turkey meat. Check them out once you're done feasting!
More Turkey Recipes You’ll Love!
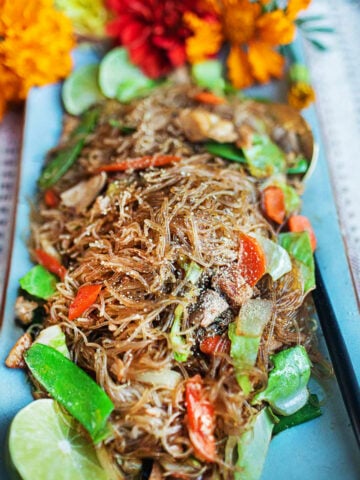
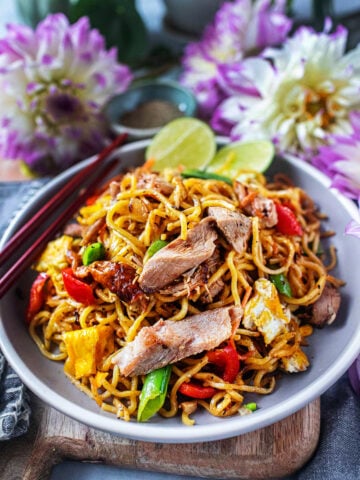
- Yakisoba noodles stir fry with leftover turkey, Turkey Tom Yum Fried rice using turkey meat, Tom Yum broth with turkey bones, Glass noodles stir fry with turkey meat, glass noodles salad, Laab turkey, Vegetable stir fry with leftover turkey, and Thai fried rice with turkey meat.
Frequently Asked Questions
For many Thais living in the US. Thanksgiving is celebrated with traditional Thanksgiving dinner, or we add a twist of Thai flavors in different dishes to combine both worlds. Each family has a different way of celebrating and doing Thanksgiving.
Thanksgiving is not celebrated in Thailand. Since turkeys are not common in Thailand, Thais don't typically cook with them.
For mixed and interracial families like mine, we have a spread of American, Thai, and Asian dishes that we bring together, like a melting pot, to celebrate at big gatherings like Thanksgiving, Christmas, and Easter.
Each family is different but for many usually means having Turkey as the main course, then dipping sauces, rice, salads, egg rolls, and spring rolls mixed with some traditional recipes with green beans, sweet potatoes, cranberry sauce, and some desserts at the end of a meal.
Experiment with different spices! My favorite spices and herbs are chilis, lemongrass, galangal, ginger, shallot, garlic, kaffir lime leaves, star anise, cloves, cinnamon sticks, and so much more! Play around with different combinations.
There are many different ways of making turkey more flavorful. Brining, marinating, and drying rubs using different spices, herbs, and sauces will make turkey flavorful. You can also try different cooking methods, like smoking, grilling, or deep frying the turkey.
This turkey with an Asian twist will be a great conversational piece during your Thanksgiving dinner. Even better, you can prepare this turkey anytime, not just during the holiday season. It's a perfect meal to make ahead of time and eat for several meals after. Stay tuned for more leftover turkey recipes coming your way!
** Love a recipe you've tried? Please leave a 5-star rating in the recipe card below and/or a review in the comments section further down the page. Or follow me on Facebook, Pinterest, or Instagram! **
Print
Thai Style Roasted Turkey (Brined and Marinated)
- Total Time: 3 hours 30 minutes
- Yield: 12 1x
- Diet: Low Lactose
Description
This Thai-style roasted turkey (brined and marinated) brings mixed flavors of East and West together in one delicious dish full of bold and tasty flavors! If you love Thai food and want more Thai flavors in your Thanksgiving bird, this turkey recipe is for you!
Ingredients
Turkey: 12-15 lb turkey
For the brine
- 2 stalks of lemongrass, cut each stalk into 2 at 5-6 inches each. Smash before use
- 10 cloves of garlic, smash before use
- 1 cup salt
- 7-8 bay leaf
- 14 cups water for the brine solution. Add up to 2 more cups to submerge the turkey
Ingredients for marinating
- 8 cloves of garlic, smashed but not crushed
- 2 shallots, chopped into medium pieces (1.5 oz)
- ¼ cup cilantro stems, cut into 1-inch pieces
- ¾ cup coconut milk
- 2 tablespoons oyster sauce
- 1 tablespoon fish sauce
- 1 tablespoon soy sauce
- 1 tablespoon dark soy sauce
- 2 tablespoons sweet soy sauce
- 1 tablespoon ground white pepper
- 3 tablespoons agave
- 1 tablespoon vegetable oil
- ¼ cup coconut oil. Unmelted and rub on the turkey before roasting.
- Water. As needed, add to the bottom of the pan to prevent burning.
Instructions
1. Brine the turkey
- Step 1: Prep the Turkey. Thaw the turkey according to the package instructions based on its weight. For example, my 12 lb turkey took about 3.5 days to thaw in the fridge. Once thawed, remove the packaging, giblets, and neck. Trim off any extra skin, fat, or unwanted parts, then rinse the turkey thoroughly with cold water.
- Step 2: Make the Brine. Bring 4 cups of water to a boil. While waiting, combine salt, smashed lemongrass stalks, garlic, and bay leaves in a large bowl. Once the water boils, turn off the heat and carefully pour the water over the aromatics in the bowl. Whisk until the salt mostly dissolves, then let it cool while you finish prepping the turkey.
- Step 3: Brine the Turkey. Add the cooled brine to a large container, then place the turkey in and add the rest of the cold water to submerge it fully (up to 2 extra cups if needed). Use a large container like a brining bag, stock pot, ice bin, or even a medium cooler. If your container isn’t big enough, check the notes for tips.
- Step 4: Let it Brine. Cover the container tightly with foil or plastic wrap. Place the turkey in the fridge or in a cool spot under 40°F for 18–20 hours. If it’s cold where you live, you can leave the brining turkey outside safely.
2. Marinating
- Step 1. Let's roll up our sleeves and get this Thai turkey going! Combine all the sauces, coconut milk, agave, and oil in a medium bowl and whisk gently together. Set aside.
- Step 2. Add cilantro stems, garlic, shallot, and ground white pepper to a small food processor. Add ⅓ cup of the marinating sauce to help turn the blades and blitz until smooth. Use a stone mortar and pestle if you have one. If not, chop everything really small into fine pieces.
- Step 3. Combine the paste into the sauce bowl and whisk well. Get ready to marinate the turkey next!
- Step 4. Remove the turkey from the brine water. It is easiest to drain the brine water from the turkey inside the sink, then wash it quickly with cold water for a few seconds. Pat dry with paper towels.
- Step 5. Line a roasting pan with a heavy duty baking sheet and place your turkey on top. Pour the marinade all over, making sure to get it into every nook and cranny—inside the cavity, around the wings, everywhere! Carefully flip the turkey to coat all sides. Note. Save about ¼ of the marinade for basting later, or scoop some from the pan as you rotate the turkey while roasting.
- Step 6. Place the turkey breast side down so the marinade soaks into the breast meat, keeping it juicy and flavorful. Cover the pan with foil and pop it in the fridge to marinate for at least 5 hours. Up to 12 hours is even better! Be sure to turn the turkey once or twice while it marinates so it gets evenly coated.
3. Roasting Time!
- Step 1. Take the turkey out of the fridge and let it sit at room temperature for up to an hour before roasting. Preheat your oven to 325°F.
- Step 2. Give the turkey one last coat of flavor by scooping up the marinade from the bottom of the pan and pouring it all over. Transfer the turkey to a cutting board temporarily, then place a roasting rack inside the foil-lined pan to lift the turkey off the bottom during roasting. Note: I used the same pan for both marinating and roasting. I left the rack out while marinating, then added it before placing the turkey back into the pan for roasting. It worked perfectly!
- Step 3. Rub ¼ cup of coconut oil under the turkey skin and all over the outside. Be gentle to avoid tearing the skin. Tuck the wings under and truss the turkey with kitchen twine to keep it compact while roasting. Place the turkey breast-side down to allow the fat to drip into the drier breast meat for extra juiciness. Note: Trussing means tying the legs together and tucking the wings close to the body. This helps the turkey cook evenly, keeps the stuffing in place, prevents burning, and gives it a nice shape.
- Step 4. Adjust your oven rack if needed, then place the turkey on it and roast at 325°F for 3-4 hours, or until the thickest part reads 165°F on a meat thermometer. Larger turkeys may take longer, so check your roasting guide for exact times.
- Step 5. After the first hour, carefully remove the turkey from the oven and brush it with the marinade. Turn the turkey breast-side up for the rest of the cooking. Be careful with the high heat.
- Step 6. With the breast side now up, brush it with more marinade and add ½ cup of water to the bottom of the pan to keep things moist. Return the turkey to the oven.
- Step 7. Check the turkey every hour, basting it with more marinated sauce. Adding ½ cup of water to the pan if it looks dry. If the skin starts to brown too quickly, loosely cover the turkey with foil.
- Step 8. When the timer goes off, use an instant-read thermometer to ensure the turkey is cooked—165°F in the thickest part of the breast. Let the turkey rest for 20 minutes before carving. Save the pan drippings to use as a dipping sauce. Enjoy!
Notes
- Use a very large container for brinning. I used an ice holder for mine, but you can use anything available. A medium size cooler could work too.
- While roasting, keep a close eye on the bird and check every hour or so, without opening the oven, to see how it’s looking.
- If the skin starts to brown too soon, use regular aluminum foil to loosely cover the turkey.
- If the wings or any smaller parts of the turkey start to burn too quickly, wrap a small piece of foil around those parts to help them not get burned by the high temperature.
- Save the bones for making turkey broth.
- The best way to flip the hot turkey is to use kitchen mitts or a clean dish cloth, hold the drumsticks while supporting the base with the other hand, and carefully lay it back onto the baking pan rack. You might need an extra hand for a larger turkey.
** Thank you so much for visiting my blog! This is truly a passion for me. If you have enjoyed these recipes and appreciate the hard work I put into them, I would love it if you would share them with your friends! Your recommendation is the highest review I could hope for, and I’d appreciate it! **
- Prep Time: 30
- Cook Time: 3 hours
- Category: Seasonal
- Method: roasting
- Cuisine: Thai


Suwanee says
Thank you, Jana!! Best compliment of this holiday as I know how big of a commitment it is to make this turkey recipe. Happy holidays to you and your family!
Jana says
Making this for the 3rd year in a row. It’s a hit every time!
Suwanee says
That's amazing! I'm delighted your turkey turned out so well, and well done with the adjusting and modifying to make it work for you!
Christine Beltran says
This recipe was great. I brined for 24 hrs and added a lot more lemongrass, about 10 stalks. I would use kaffir leaves next time vs bay leaves
I marinated for 20 hrs. Used maple syrup instead of agave. I did turkey drumsticks and thighs versus a whole turkey.
Meat was super flavorful and not salty. Definitely not dry. Next time I would serve with bao buns. Honestly it tasted like Peking duck but not oily! It was a nice change and I will definitely make again. Thx for the recipe.
Suwanee says
Hi Laura,
I’d say marinate the turkey for up to 10 hours if you can, but if you’re short on time, 4 hours will work too. Here’s a little trick: poke a few holes in the turkey with a toothpick before marinating to let the flavors soak in better. Then, pour the marinade all over and give the turkey a good massage to work the sauce into the meat. Do this a couple of times before roasting—it helps tenderize the meat and speeds up the marinating process. Happy Thanksgiving!
Laura says
Hi. We would like to do this with a boneless turkey breast, as we have only three people for dinner this year and we have a breast already (7.5 lbs). We have already brined it for about 10 hours. I was wondering what you would recommend for the marinating time. Please advise if you have any ideas. Thank you!
Suwanee says
Hi Sophiea,Thank you for your interest in my turkey recipe! Regarding your question about adjusting it for a 4-pound chicken, here’s my best estimate:
4 lbs chicken
For the brine
* 2 small stalks of lemongrass, cut each stalk into 2 at 5-6 inches each. Smash before use
* 10 cloves of garlic, smash before use
* 1/4 cup salt
* 5 bay leaf
* 8 cups water for the brine solution. Add up to 2 more cups to submerge the turkey
Ingredients for marinating
* 4 cloves of garlic, smashed but not crushed
* 1 small shallots (1/4 cups) chopped into medium pieces
* 1/4 cup cilantro stems, cut into 1-inch pieces
* 1/4 cup coconut milk
* 1 tablespoons oyster sauce
* 1 teaspoon fish sauce
* 1 teaspoonsoy sauce
* 1 teaspoon dark soy sauce
* 2 tablespoons sweet soy sauce
* 1/2 teaspoon ground white pepper, use as needed-they are spicier than black pepper
* 1 tablespoons agave, honey
* 1 tablespoon vegetable oil
* 1 tablespoon coconut oil. Unmelted and rub on the turkey before roasting.
* Water. As needed, add to the bottom of the pan to prevent burning.
While I haven’t tested this adaptation yet, it’s based on my instincts. I recommend tasting the marinating sauce and adjust it. It might taste a bit saltier at first, but much of that will mellow out during cooking.
Feel free to reach out if you have any questions.Thank you!
Sophiea says
How can I adjust this for a 4 lb chicken?
Suwanee says
This is fantastic to hear, Jana! I'm delighted and well done! Enjoy!
Jana says
I made this for Christmas dinner and it was a HIT! Best turkey we’ve ever had. So flavorful, tender, and even the white meat was moist. I couldn’t find lemongrass for the brine so I substituted fresh ginger and it worked well. We made bao buns and made little bao sandwiches 😚👌🏼
I have a feeling I’ll be in charge of the turkey for Thanksgiving next year.
warapond says
looks delicious! Thank you for your recipe.
Suwanee says
I can't wait for you to try it, Angela!
Angela says
This looks delicious! I usually make a Koji turkey, but I’ll have to try this out. Thanks!